Learn how to make a DIY tubular bead bracelet using the simple circle stitch. This step‑by‑step tutorial includes a materials list, color ideas, and pro tips for a perfect finish.
Keywords: tubular bead bracelet, circle stitch bracelet, DIY beaded bracelet, seed bead bracelet tutorial, beginner beading project
Introduction
If you are new to bead weaving, the tubular bead bracelet (also known as the circle stitch or tubular peyote stitch) is the perfect place to start. It is simple, repetitive, and creates a beautiful rope‑like bracelet that looks much more complex than it actually is.
The best part? You only need a few basic supplies. In less than an hour, you can make a sturdy, flexible bracelet that fits perfectly on your wrist.
In this tutorial, I will show you exactly how to make a tubular bead bracelet from start to finish. Let us dive in.
Materials List
| Item | Details |
|---|---|
| Seed beads (size 6/0 or 8/0) | Approximately 2–3 grams – any color(s) you like |
| Beading thread | 2 feet (60 cm) – FireLine, WildFire, or Nymo |
| Beading needle | Size 10 or 12 |
| Clasp | Lobster clasp, toggle clasp, or magnetic clasp |
| Jump rings | 2 pieces |
| Scissors | – |
| Bead mat (optional) | Keeps beads from rolling away |
Beginner note: Size 6/0 or 8/0 beads are larger and much easier to handle than tiny size 11/0 beads. Start with these.
What Is a Tubular Bead Bracelet?
A tubular bead bracelet is a hollow, rope‑like structure made entirely of beads. Unlike flat bead weaving, which creates a wide strip, tubular weaving creates a round or oval tube. This makes the bracelet flexible, comfortable to wear, and surprisingly strong.
The technique is called the circle stitch because you continuously work in circles (rounds), adding a few beads at a time.
Step‑by‑Step Instructions
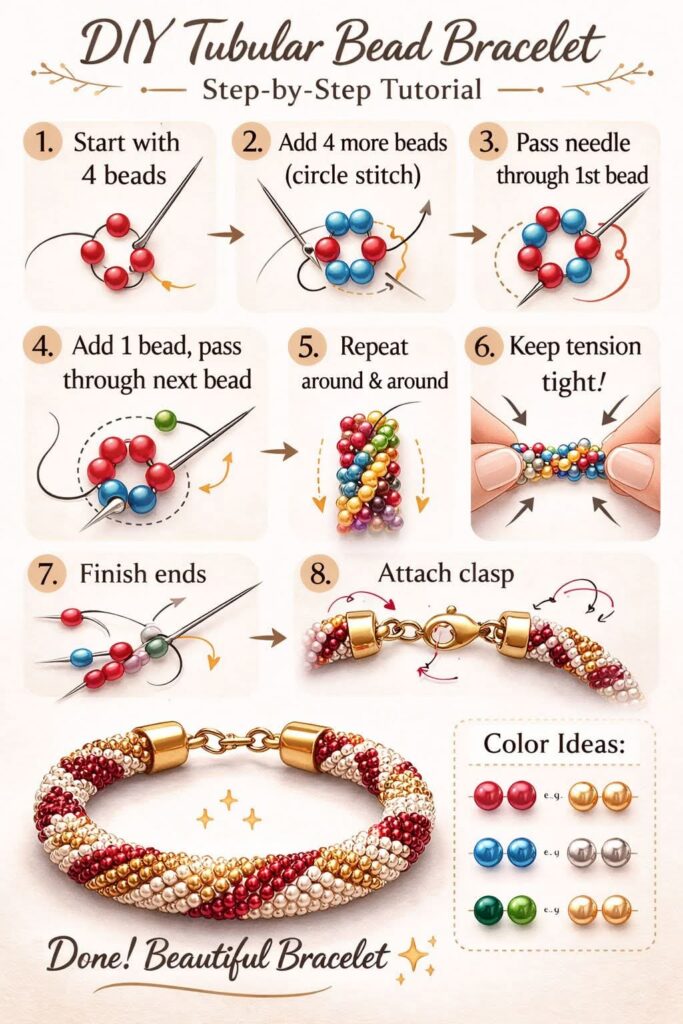
Step 1 – Start with 4 beads
Cut approximately 2 feet (60 cm) of thread. Thread your needle.
Pick up 4 beads of your main color. Slide them to the middle of the thread.
Tie a small overhand knot to form a tight ring. Alternatively, pass your needle through all 4 beads a second time to close the circle without a knot.
Image reference: “Start with 4 beads”
Step 2 – Add 4 more beads (circle stitch)
Now pick up 4 new beads (same color or a contrasting color – your choice).
Pass your needle through the first bead from your original set of 4.
You now have two rings of 4 beads sitting side by side. This is the foundation of your tube.
Image reference: “Add 4 more beads (circle stitch)”
Step 3 – Pass needle through the 1st bead
Your thread should now be exiting from the first bead of the second ring.
This positions you correctly to begin the circular weaving.
Image reference: “Pass needle through 1st bead”
Step 4 – Add 1 bead, pass through next bead
This is the core repeating step of the entire bracelet.
4.1 Pick up 1 bead.
4.2 Pass your needle through the very next bead from the previous round (the bead immediately after where your thread came out).
4.3 Pull the thread tight.
You will see the new bead settle into place between two existing beads.
Image reference: “Add 1 bead, pass through next bead”
Step 5 – Repeat around and around
Continue the same action:
- Add 1 bead
- Pass through the next bead from the previous round
- Pull tight
Each full round will use exactly 4 beads (one bead for each “gap” in the previous round), even though you add them one at a time.
Do not rush. Keep the rhythm steady.
Image reference: “Repeat around & around”
Step 6 – Keep tension tight!
Tension is the secret ingredient to a beautiful tubular bracelet.
- Too loose → gaps appear between beads, and the tube looks messy.
- Too tight → the bracelet curls into a stiff, uncooperative shape.
- Just right → the beads sit snugly against each other, and the tube is flexible but firm.
Pull each stitch firmly but gently. After a few rounds, you will feel the correct tension naturally.
Image reference: “Keep tension tight!”
Step 7 – Finish the ends
When your bracelet reaches the desired length (typically 6–7 inches for a wrist), it is time to finish.
7.1 Weave your thread back through the last round of beads – do not add any new beads.
7.2 Tie 2–3 small half‑hitch knots between two beads (not on top of a bead).
7.3 Pass the needle through 3–4 more beads in different directions to hide the tail.
7.4 Trim the thread as close to a bead as possible.
7.5 Repeat the same finishing process on the starting end (remove the initial knot if you made one).
Image reference: “Finish ends”
Step 8 – Attach the clasp
You will need 2 jump rings and your chosen clasp.
8.1 Open one jump ring using pliers (twist sideways – do not pull apart).
8.2 Slip the jump ring through the end bead(s) of your bracelet.
8.3 Attach the clasp to the same jump ring.
8.4 Close the jump ring securely – there should be no visible gap.
8.5 Repeat on the other end of the bracelet with the second jump ring and the other half of the clasp.
Image reference: “Attach clasp”
Step 9 – Done! Beautiful bracelet
Hold up your finished bracelet. You have created a professional‑looking, handmade accessory from just beads and thread.
Wear it alone or stack it with other bracelets. Give it as a gift. Or make another one in a different color – I promise, once you learn this stitch, you will want to make several.
Image reference: “Done! Beautiful Bracelet”
Color Ideas (from your image)
The original tutorial suggests these colors:
- Red – bold and passionate
- Blue – calm and cool
- Green – fresh and natural
- Yellow – bright and cheerful
- Gold – elegant and luxurious
More Color Combinations to Try
| Combination | Effect |
|---|---|
| Black + white | Classic monochrome |
| Pink + silver | Feminine and sparkly |
| Turquoise + coral | Bohemian summer vibes |
| Navy + gold | Sophisticated evening wear |
| Rainbow (red, orange, yellow, green, blue, purple) | Fun and playful |
Pro Tips for a Perfect Tubular Bracelet
✔ Use a stop bead – Temporarily add a bead at the thread end to prevent your first 4 beads from sliding off while you work.
✔ Check your bead count – Each round must have exactly 4 beads. If your tube starts to twist, you accidentally added or skipped a bead.
✔ Work in good light – Seed beads are small. Good lighting saves your eyes.
✔ Take breaks – If your hands cramp, set the project down for 10 minutes.
✔ Seal the ends – For nylon thread, carefully melt the trimmed tail with a lighter to create a tiny “blob” that cannot slip back through the beads.
Troubleshooting Guide
| Problem | Likely Cause | Fix |
|---|---|---|
| Tube twists like a spiral | Missed a bead in the previous round | Undo the last few stitches and recount |
| Gaps between beads | Tension too loose | Pull each stitch tighter |
| Bracelet is too stiff | Tension too tight | Loosen slightly – the tube should bend easily |
| Thread breaks | Old thread or too much friction | Use FireLine or WildFire (stronger than nylon) |
| Clasp falls off | Jump ring not fully closed | Squeeze with pliers until no gap remains |
How to Adjust Bracelet Length
| Wrist Size | Approximate Tube Length (before clasp) | Number of Rounds |
|---|---|---|
| 5.5” (child/small) | 5 inches | 50–55 rounds |
| 6” (small adult) | 5.5 inches | 55–60 rounds |
| 6.5” (medium) | 6 inches | 60–65 rounds |
| 7” (large) | 6.5 inches | 65–70 rounds |
| 7.5” (extra large) | 7 inches | 70–75 rounds |
Add 0.5 inch for the clasp. A 6‑inch tube + clasp = approximately 6.5‑inch finished bracelet.
Frequently Asked Questions (FAQ)
Can I use elastic thread?
No. Elastic thread is not strong enough for the circle stitch, and it will break over time. Use non‑stretch beading thread.
What is the best thread for tubular bead weaving?
FireLine (fishing line) is extremely strong and does not fray. WildFire is similar. Nymo is good but requires conditioning with wax.
How long does it take to make one bracelet?
For a beginner: 1–2 hours. Once you are comfortable with the stitch: 30–45 minutes.
Can I use different bead sizes in the same bracelet?
Yes, but keep the sizes very close (e.g., all 8/0). Mixing very different sizes will make the tube uneven.
My bracelet keeps curling – what am I doing wrong?
Your tension is too tight. Loosen each stitch slightly. The tube should be flexible, not rigid.
Variations to Try Once You Master the Basics
- Striped tube – Change colors every 2–3 rounds
- Dotted tube – Use a contrasting bead every 4th bead in each round
- Graduated tube – Start with larger beads, then switch to smaller beads
- Spiral tube – Shift the color change by one bead each round
- Charm bracelet – Add a small charm to the clasp or jump ring
Final Thoughts
The DIY tubular bead bracelet is one of the most satisfying beginner beading projects. It requires only a few supplies, uses a simple repeating stitch, and produces a beautiful, wearable result.
Once you finish your first bracelet, you will understand why beaders love this technique. It is meditative, portable (take it anywhere), and endlessly customizable.
So pick your colors – red, blue, green, yellow, or gold – and start stitching. Your wrist is waiting.
Pin This Tutorial
Save this post to your DIY Jewelry or Beading for Beginners board. Tag a friend who loves handmade accessories. And when you finish your tubular bracelet, share a photo – we would love to see your color combinations.

")

