Learn how to make a beautiful spiral stitch beaded bracelet with this step‑by‑step tutorial. Perfect for beginners – includes materials list, photos, and finishing tips.
Keywords: spiral stitch bracelet, beaded spiral tube tutorial, DIY beaded bracelet, seed bead bracelet, Morahs Collection
Introduction
The spiral stitch (also known as the spiral rope or African spiral stitch) is one of the most popular bead weaving techniques. It creates a twisted, rope‑like tube that looks intricate but is surprisingly simple to learn.
Unlike the tubular peyote stitch, which uses a strict bead‑by‑bead pattern, the spiral stitch is more forgiving and works up quickly. Once you learn the rhythm, you can make a bracelet in under an hour.
This tutorial is based on the Morahs Collection method shown in the images. Let us get started.
Materials List
| Item | Details |
|---|---|
| Seed beads (size 8/0 or 11/0) – main color | Approximately 3–4 grams |
| Seed beads – contrast color (for the spiral) | Approximately 1–2 grams |
| Beading thread | 2.5 feet (75 cm) – FireLine or Nymo |
| Beading needle | Size 10 or 12 |
| Clasp | Lobster, toggle, or magnetic clasp |
| Jump rings | 2 pieces |
| Scissors | – |
| Bead mat (optional) | Prevents beads from rolling |
Beginner tip: Use size 8/0 beads for your first spiral stitch. They are larger and much easier to see and handle.
What Is the Spiral Stitch?
The spiral stitch creates a twisted, flexible tube that looks like a candy cane or barber pole. It is made by repeating a simple pattern:
- A small core bead (or group of beads)
- A longer spiral bead that wraps around the core
The result is a bracelet that is strong, comfortable, and visually striking.
Step‑by‑Step Instructions
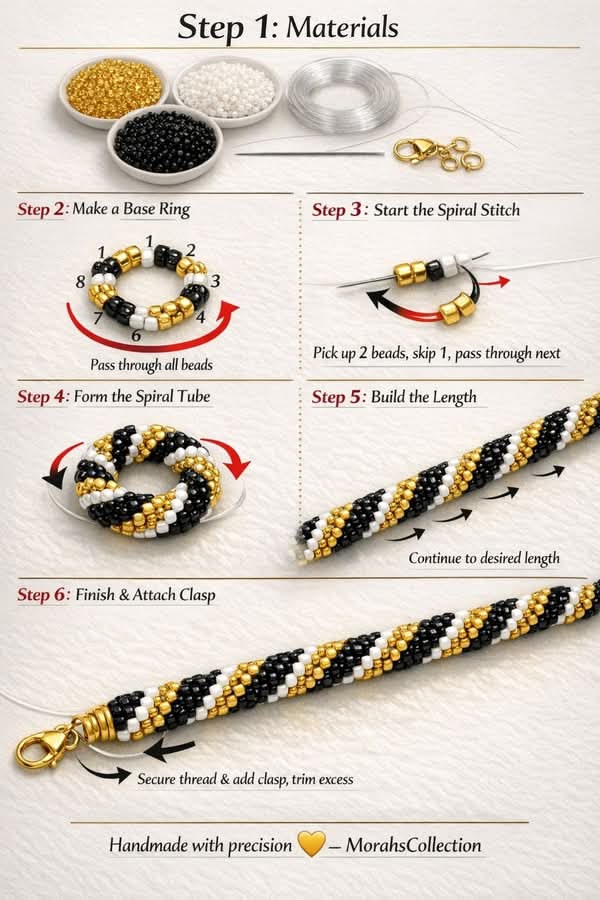
Step 1 – Gather your materials
Before you begin, make sure you have all your supplies within reach. Lay your beads out on a bead mat or a soft cloth.
Choose two colors that contrast well:
- Core color (the background – often a neutral or dark color)
- Spiral color (the accent that wraps around – bright or metallic)
Image reference: “Step 1: Materials”
Step 2 – Make a base ring
Cut approximately 2.5 feet (75 cm) of thread. Thread your needle.
Pick up a small group of beads to form the foundation ring. For a standard spiral stitch:
- Pick up 4 beads of your core color
- Tie them into a ring by passing your needle through all 4 beads a second time
- Pull tight
You now have a small circle of beads. This is the anchor for your spiral.
Image reference: “Step 2: Make a Base Ring”
Step 3 – Start the spiral stitch
Now you will begin the actual spiral pattern.
The basic pattern:
Pick up 2 beads (one core + one spiral? Let me clarify the standard method).
Actually, for a classic spiral stitch:
3.1 Pick up 3 beads:
- 2 core color beads
- 1 spiral color bead
3.2 Skip 1 bead on the base ring, then pass your needle through the next bead.
3.3 Pull tight.
3.4 Pass your needle through all beads in the new loop to lock them in place.
Image reference: “Step 3: Start the Spiral Stitch – Pick up 2 beads, skip 1, pass through next – Pass through all beads”
Step 4 – Form the spiral tube
Continue the same pattern around and around:
Repeat each round:
- Pick up 2 core beads + 1 spiral bead (or your chosen pattern)
- Skip 1 bead from the previous round
- Pass through the next bead
- Pull tight
- Pass through all new beads to lock
Each round will naturally shift slightly, creating the spiral effect.
Image reference: “Step 4: Form the Spiral Tube”
Step 5 – Build the length
Keep repeating the pattern until your bracelet reaches the desired length.
For a standard wrist (6.5–7 inches), you will need approximately:
- 6–7 inches of woven tube (before adding the clasp)
Do not rush. Check your tension every few rounds:
- Too loose → gaps appear
- Too tight → the tube becomes stiff and does not spiral properly
Image reference: “Step 5: Build the Length – Continue to desired length”
Step 6 – Finish and attach the clasp
When your bracelet is long enough:
6.1 Weave your thread back through the last 5–6 beads of the tube (no new beads).
6.2 Tie 2–3 small half‑hitch knots between two beads.
6.3 Pass the needle through 3–4 more beads in different directions to hide the tail.
6.4 Trim the thread as close to a bead as possible.
6.5 Repeat the finishing process on the starting end.
6.6 Open a jump ring with pliers. Attach it to the end of the bracelet and to one half of the clasp. Close securely.
6.7 Repeat on the other end with the second jump ring and the other half of the clasp.
6.8 Trim any excess thread.
Image reference: “Step 6: Finish & Attach Clasp – Secure thread & add clasp, trim excess”
Done – Handmade with precision
Congratulations! Your spiral stitch beaded bracelet is complete.
Image reference: “Handmade with precision – Morahs Collection”
Hold it up to the light. The spiral should twist gracefully from end to end. Wear it with pride – you made this.
Spiral Stitch Pattern Variations
| Pattern | Bead Sequence (per stitch) | Effect |
|---|---|---|
| Classic 2+1 | 2 core + 1 spiral | Tight, distinct spiral |
| Bold spiral | 1 core + 2 spiral | Thicker, more prominent spiral line |
| Even count | 3 core + 1 spiral | Slower twist, more background color |
| Fast spiral | 1 core + 1 spiral | Very tight, rapid twist |
Experiment to find the look you love.
Color Ideas
| Core Color | Spiral Color | Vibe |
|---|---|---|
| Black | Gold | Elegant, evening wear |
| White | Rainbow | Playful, festival style |
| Navy | Silver | Nautical, sophisticated |
| Brown | Turquoise | Southwestern, boho |
| Deep red | Cream | Vintage, romantic |
| Grey | Neon pink | Modern, edgy |
Pro Tips for a Perfect Spiral Stitch
✔ Use contrasting colors – The spiral will disappear if your colors are too similar.
✔ Keep your thread taut but not tight – The spiral needs a little flexibility to twist correctly.
✔ Count your beads carefully – Skipping or adding a bead will break the spiral pattern.
✔ Check the spiral direction – If your spiral twists the wrong way, you reversed the pattern. Undo and restart.
✔ Use a stop bead – Place a temporary bead at the thread end to prevent your base ring from unraveling while you work.
Troubleshooting Guide
| Problem | Likely Cause | Fix |
|---|---|---|
| No spiral – tube is straight | Pattern not shifting | Make sure you are skipping 1 bead each round |
| Spiral is uneven | Inconsistent tension | Pull each stitch with the same force |
| Gaps between beads | Tension too loose | Tighten each stitch slightly |
| Tube is too stiff | Tension too tight | Loosen – the tube should bend easily |
| Thread breaks | Old thread or sharp bead edges | Use FireLine and check beads for sharp holes |
| Clasp falls off | Jump ring not fully closed | Squeeze with pliers until no gap remains |
How to Adjust Bracelet Length
| Wrist Size | Tube Length (before clasp) | Approximate Rounds |
|---|---|---|
| 5.5” (child) | 5 inches | 40–45 rounds |
| 6” (small adult) | 5.5 inches | 45–50 rounds |
| 6.5” (medium) | 6 inches | 50–55 rounds |
| 7” (large) | 6.5 inches | 55–60 rounds |
| 7.5” (extra large) | 7 inches | 60–65 rounds |
Add 0.5 inch for the clasp. A 6‑inch tube + clasp = 6.5‑inch finished bracelet.
Frequently Asked Questions (FAQ)
Is the spiral stitch good for beginners?
Yes! It is one of the easiest tube stitches. The pattern repeats every 2–3 beads, so it is hard to get lost.
What size beads should I use?
Start with size 8/0. Once you master the stitch, try size 11/0 for a daintier bracelet.
Can I use elastic thread?
No. Elastic thread will not hold the structure of the spiral stitch. Use non‑stretch beading thread.
Why does my spiral look like a straight tube?
You are not skipping a bead each round. The skip is what creates the spiral shift. Go back to Step 3 and check your pattern.
How do I make a necklace instead of a bracelet?
Use the exact same stitch, but continue weaving until the tube measures 16–18 inches (for a short necklace) or longer.
Variations to Try
- Two‑color spiral – Alternate two different spiral colors
- Graduated spiral – Start with larger beads, then switch to smaller beads
- Spiral with charms – Add a small charm to the clasp or jump ring
- Multi‑strand spiral – Make two or three spiral bracelets and wear them together
Final Thoughts
The spiral stitch is a classic bead weaving technique for a reason. It is simple enough for beginners but beautiful enough for experienced beaders. Once you learn the rhythm, you will find yourself making spiral bracelets in every color combination imaginable.
This tutorial was inspired by Morahs Collection – handmade with precision. Now it is your turn.
Pick your colors, thread your needle, and enjoy the satisfying twist of the spiral stitch.
Pin This Tutorial
Save this post to your DIY Jewelry or Bead Weaving for Beginners board. Tag a friend who loves handmade accessories. And when you finish your spiral bracelet, share a photo – we would love to see your color combinations.


")
")