Kano Knot & Braiding an East-Asian Inspired Sachet and Charm: Are you looking to elevate your macrame skills and incorporate traditional, symbolic knotting techniques into your work? Look no further! The Double Kano Knot (二重叶結び in Japanese) is a stunning, interlocking knot with roots in traditional Japanese and East Asian crafting. Symbolizing longevity, fulfillment, and “granting a wish” (due to its ‘Kano’ meaning), it makes for a beautiful addition to decorative charms, sachets, and jewelry.
Part 1: Mastering the Double Kano Knot (The “Grant a Wish” Knot)
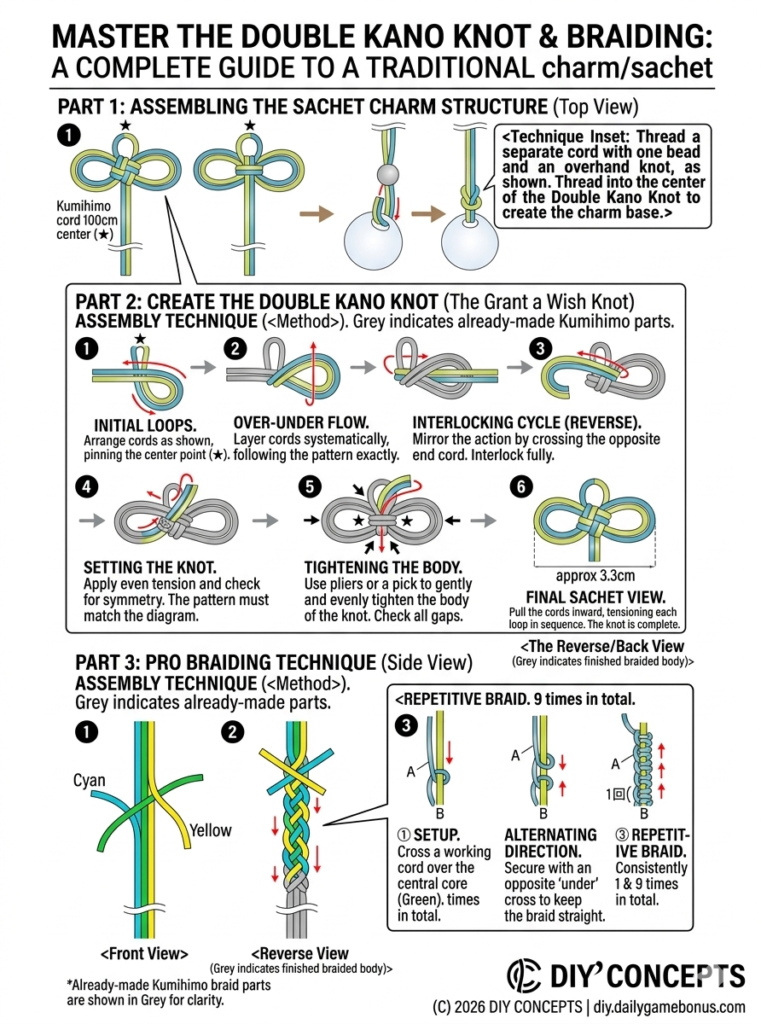
This knot is the foundation of the entire charm structure and is detailed in the large central section of your new instruction sheet (Regenerated Image Panel 2).
- Preparation (STEP 1): Start by looping your cord (Color 1 – Cyan, Color 2 – Yellow) as shown, pinning the center point ($\star$). This establishes the base structure.
- The Over-Under Flow (STEP 2): Layer your cords systematically, following the simple over-under rule. A bold red arrow shows the main movement of the yellow cord.
- The Reverse Interlock (STEPS 3-4): Mirror the action by crossing the purple-end cord. This interlocking action is what gives the Kano knot its density and symmetry. Always check that your pattern matches the image perfectly.
- Tensioning is Everything (STEP 5-6): Use small pliers or a macrame pick to gently and evenly tighten the knot. The final knot should be approximately 3.3cm wide. This step is crucial for preventing a sloppy, malformed result!
Part 2: Creating the Sachet Charm Assembly
With the Double Kano Knot complete, we can now assemble the sachet charm structure shown in the upper section of the regenerated sheet. This provides a great practical application for your knotting.
- Anchor and Thread (Step 1a): Start at the pinned central point ($\star$) from Part 1. Thread your 100cm Kumihimo cord through. This serves as your main structure.
- The Inset Technique (Step 1c): Take two separate threads and thread them with a single bead and an overhand knot as shown in the inset. These will be your decorative tails.
- Locking the Assembly: Thread these tail assemblies into the center of the Kano knot. This creates a secure, symmetrical base. Apply a small amount of glue to the final center knot to prevent it from ever coming undone.
Part 3: The Intermediate Finish – Pro Braiding Technique
The last section of our instruction sheet (Regenerated Image Panel 3) covers the intermediate braiding finish that provides the final, polished look to your charm.
Think of this technique as a simplified, compact variation of the Crown Braid we mastered in a previous guide. The goal is to alternate directions to keep the braid straight.
- Setup (Braiding STEP 1): Cross the Cyan cord over the central core (Green).
- Alternating Direction (Braiding STEP 2): Secure it by crossing the Yellow cord under the Green core and through the Cyan loop. This alternating “over/under” pattern is key!
- Consistent Repetition (Braiding STEP 3): Replicate the “over-under” pattern (Steps 1 and 2) exactly 9 times in total to build a sturdy, dense braid. Pull all cords inward to maintain consistent tension.


