How to Make a Macrame Square Knot : If you can tie a Square Knot, you can make a friendship bracelet! Also known in Japanese macrame as the Hira-musubi (Flat Knot), this is arguably the single most important knot you will ever learn. It is the foundation for thousands of bracelet, choker, and wall hanging patterns.
This comprehensive guide breaks down the technique into two simple parts: a list of the ideal materials and a clear, four-step visual tutorial designed for beginners.
Part 1: The Materials List – Setting Up For Success 🧶
The key to a perfect knot isn’t just technique—it’s also the material you choose. For a strong, defined Square Knot, we recommend using a 1mm or 0.8mm waxed cord. The wax coating provides “grip,” which helps keep the knots uniform and prevents them from slipping as you work.
- Working Cords (Knotting Cords): Two identical 1mm strands. We use Blue and Purple in this guide to make the path of each cord easy to trace. (Length: approx. 1 meter each for a full bracelet).
- Holding Cords (Core Cords): A central bundle of 1mm strands (we use White). In friendship bracelets, these are the “core” and are usually made thicker or bundled together. (Length: slightly longer than your final bracelet length).
- Tools: A Macrame Board (or clipboard) and Tape to secure the top of your holding cords.
Part 2: Step-by-Step Square Knot (Hira-musubi) Tutorial
In this tutorial, we visualize the original Japanese diagram (image_6.png) with clear, numbered English labels.
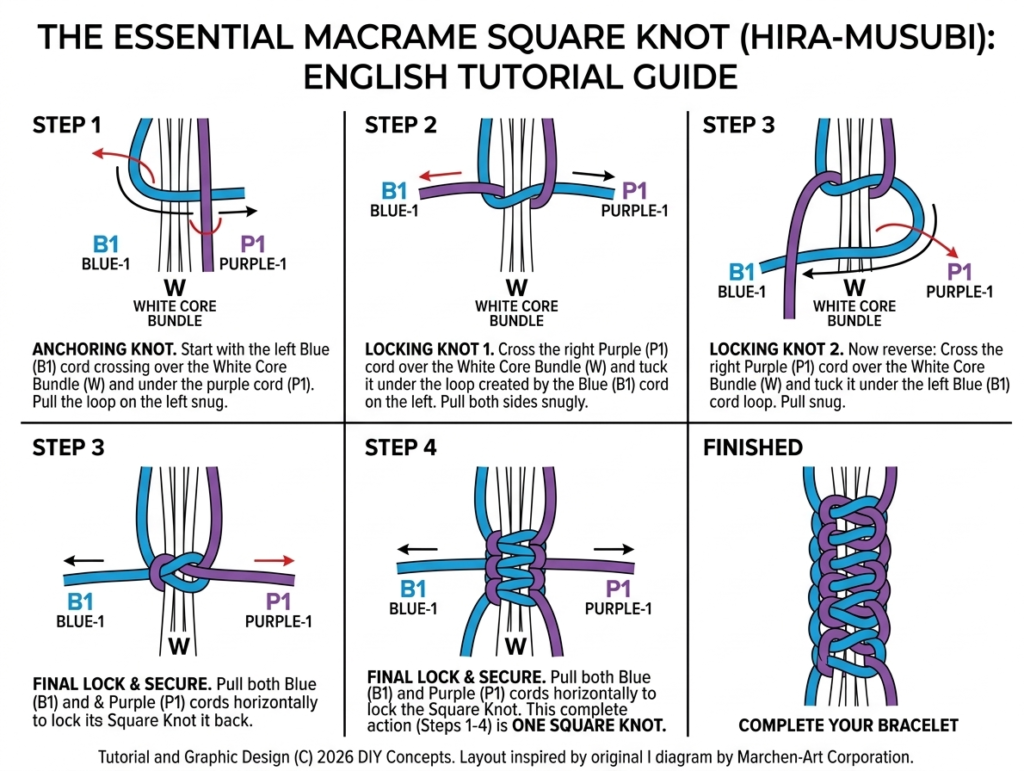
📝 Tutorial Text Breakdown (Matching the Image):
Part A: The Initial Anchoring Knot
- Panel 1 (STEP 1): Take your right Purple (P1) cord. Pass it over the White Core Bundle (W) and under the left Blue (B1) cord loop. Pull the knot snug. The Blue cord now is on the right side.
- Panel 2 (STEP 2): Now, take the left Blue (B1) cord. Pass it over the White Core Bundle (W) and tuck it under the Purple (P1) cord loop on the right. Pull both cords horizontally. This completes the first half-knot.
Part B: The Locking Half-Knot (Reversing the Direction)
- Panel 3 (STEP 3): To lock the knot and make it symmetrical, we must reverse the action. Cross the right Purple (P1) cord over the White Core Bundle (W) and tuck it under the left Blue (B1) cord loop. Pull snug.
- Panel 4 (STEP 4): This is the final action. Reversing ensures the knot stacks perfectly flat. Pull both working cords snugly. You have now completed ONE full Square Knot. Repeat Steps 1-4 to build your bracelet!
Part 3: Why This Knot is “The Gold Standard” 💡
Unlike a simple overhand knot, the Hira-musubi (Square Knot) is designed to be reversible, secure, and permanent. If you use non-waxed cotton or nylon, the loop may stretch over time, causing your bracelet to loosen or fall out of its clasp.


")
")