Learn how to make a beautiful macramé bag with this easy step‑by‑step tutorial. Includes materials list, knot instructions, measurements, and photos. Perfect for beginners!
Introduction
Macramé bags are stylish, eco‑friendly, and surprisingly fun to make. Whether you need a beach bag, a farmers market tote, or a boho‑chic purse, this project delivers. The open, knotted design is lightweight yet strong, and the natural cotton cord gives it a beautiful, organic texture.
In this tutorial, you will learn how to make a macramé bag from start to finish. We will cover:
- Cutting the cords
- Attaching to a wooden ring
- Tying flat knots (square knots)
- Shaping the diamond (rhombus) pattern
- Weaving the bottom
- Adding the handles
Let us get started.
Materials Needed
| Item | Quantity / Specs |
|---|---|
| Cotton macramé cord (3–4mm thickness) | 16 pieces × 3 meters (10 feet) each |
| Wooden ring (for the top opening) | 1 piece (approximately 2–3 inches / 5–8 cm diameter) |
| Cotton cord for handles | 2 pieces × 60 cm (24 inches) each |
| Scissors | – |
| Measuring tape | – |
| Masking tape or cord clips | Optional – to hold work in place |
| Comb or brush | For fraying the fringe (optional) |
Total cord needed: Approximately 48 meters (160 feet) for the main body + 1.2 meters (4 feet) for the handles.
Step‑by‑Step Instructions
Step 1 – Cut the cords
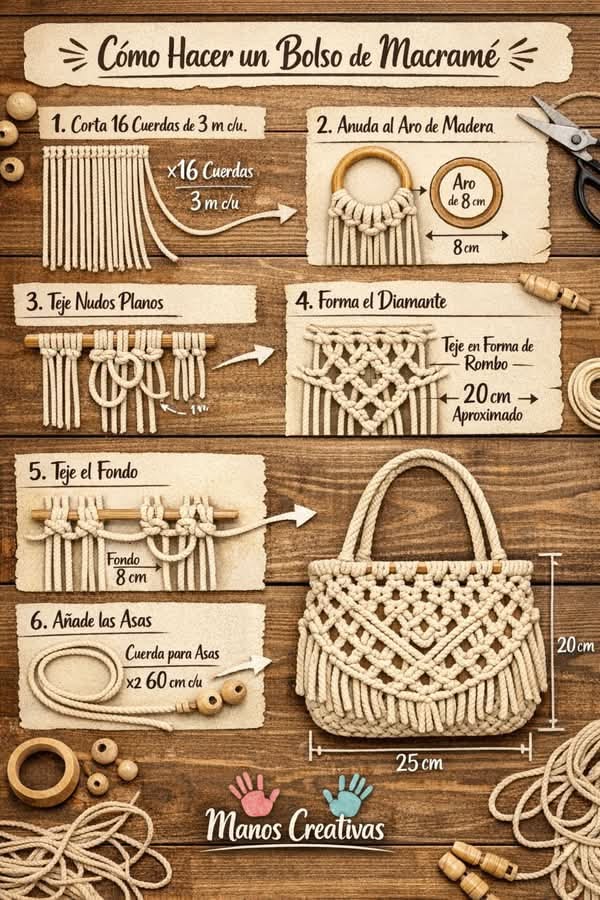
Cut 16 pieces of cord, each 3 meters (10 feet) long.
Image reference: “1. Corta 16 Cuerdas de 3 m chu” – Cut 16 cords of 3 meters each.
If you are new to macramé, add an extra 20–30 cm to each cord. It is better to have too much length than too little.
Pro tip: Wrap a small piece of masking tape around each cut end to prevent fraying while you work.
Step 2 – Attach the cords to the wooden ring
Take your wooden ring. You will attach all 16 cords using a lark’s head knot (also called a cow hitch).
How to tie a lark’s head knot:
- Fold one cord in half to find the midpoint.
- Place the folded loop behind the wooden ring.
- Pull the loop forward over the ring.
- Bring the two tails through the loop.
- Pull tight.
Repeat for all 16 cords. You will now have 32 tails hanging down from the ring (each cord gives 2 tails).
Image reference: “2. Anuda al Aro de Madera” – Knot onto the wooden ring.
Step 3 – Tie flat knots (square knots)
Now you will begin knotting the body of the bag. The primary knot used is the flat knot (also called the square knot).
How to tie a flat knot (square knot):
- Take 4 cords (two from the left, two from the right).
- Left cord over the middle two cords and under the right cord.
- Right cord under the middle two cords and up through the left loop.
- Pull tight.
- Then reverse: right cord over the middle, left cord under and through.
- Pull tight. One complete flat knot = two halves.
For this bag:
Work in rows across all 32 cords. Divide them into groups of 4 cords each. Tie 1–2 flat knots in each group.
Image reference: “3. Teje Nudos Planos” – Weave flat knots.
Step 4 – Form the diamond (rhombus) shape
After 2–3 rows of flat knots, you will begin shaping the bag into a diamond (rhombus) pattern.
How to create the diamond shape:
- In each row, skip the first and last 2 cords.
- Gradually decrease the number of knots per row toward the center.
- Then increase again.
The diamond pattern gives the bag its distinctive boho look and creates width in the middle.
Continue knotting until the diamond measures approximately 20 cm (8 inches) from top to bottom.
Image reference: “4. Forma el Diamante – Teje en Forma de Rombo – 20 cm → Aproximado” – Form the diamond. Weave in a rhombus shape. Approximately 20 cm.
Step 5 – Weave the bottom of the bag
Once the diamond is complete, you will close the bottom of the bag.
To form the bottom:
- Gather all cords together.
- Divide them into groups of 4 cords again.
- Tie flat knots across the entire width.
- Work for approximately 8 cm (3 inches).
This creates a flat, sturdy bottom for your bag.
Image reference: “5. Teje el Fondo – Fondo – 8 cm” – Weave the bottom. Bottom – 8 cm.
Step 6 – Add the handles
Now it is time to attach the handles so you can carry your bag.
Take your 2 pieces of 60 cm (24 inches) cord for the handles.
Option A – Knot handles directly:
- Attach one handle cord to the left side of the wooden ring using a lark’s head knot.
- Attach the other handle cord to the right side of the wooden ring.
- Braid or twist each handle cord, then tie a knot at the desired length.
Option B – Wrapped handles (more polished):
- Attach each handle cord to the ring.
- Bring both tails down and tie a flat knot at the bottom of the handle.
- Trim and fray the ends for a decorative tassel.
The finished bag should have a total height of approximately 20–25 cm (8–10 inches) from the ring to the bottom.
Image reference: “6. Añade las Asas – Cuerda para Asas – x2 60 cm chu” – Add the handles. Handle cords – 2 × 60 cm.
Step 7 – Finish and trim
- Check all knots. Make sure they are tight and even.
- Trim any uneven cord ends at the bottom of the bag.
- If you want a fringe, leave the bottom tails long (10–15 cm / 4–6 inches). Brush them with a comb to create a soft, frayed look.
- If you prefer a clean bottom, tie a row of flat knots close to the ends, then trim just below the knots.
Final Measurements Summary
| Part | Length |
|---|---|
| Diamond body | 20 cm (8 inches) |
| Bottom | 8 cm (3 inches) |
| Total bag height (without handles) | 28 cm (11 inches) |
| Handles | 60 cm (24 inches) each (before knotting) |
Image reference: Bottom right diagram shows “20 cm” and “25 cm” – likely the width and height of the finished bag.
Complete Materials List (Printable)
FOR THE BAG BODY:
□ 16 pieces of 3mm cotton cord, each 3 meters long
□ 1 wooden ring (5–8 cm diameter)

FOR THE HANDLES:
□ 2 pieces of 3mm cotton cord, each 60 cm long

TOOLS:
□ Scissors
□ Measuring tape
□ Masking tape (optional)
□ Comb (for fringe, optional)

TOTAL CORD: ~50 meters
Knot Reference Guide
Lark’s Head Knot (Cow Hitch)
Used to attach cords to the ring.
Flat Knot (Square Knot)
The main knot for the bag body.
Sequence: Left over middle → right through → right over middle → left through.
Diamond (Rhombus) Shaping
Gradually decrease knot count per row toward the center, then increase.
Pro Tips for a Perfect Macramé Bag
✔ Use 3mm or 4mm cotton cord – Thinner cord (2mm) takes much longer. Thicker cord (5mm+) becomes heavy.
✔ Work on a flat surface – A table or floor with a mat helps keep your rows straight.
✔ Maintain even tension – All flat knots should look identical. Too loose = gaps. Too tight = bag curls.
✔ Check your length before cutting – Measure twice, cut once. Running out of cord is frustrating.
✔ Add a liner (optional) – For small items like keys or phone, sew a simple fabric liner and stitch it inside.
Troubleshooting Guide
| Problem | Likely Cause | Fix |
|---|---|---|
| Bag is crooked | Uneven tension left vs. right | Undo last 2 rows and re‑knot with even pulling |
| Knots come loose | Not tightened enough | Go back and tighten each flat knot |
| Bottom has holes | Cords not grouped correctly | Make sure each flat knot uses 4 cords (2+2) |
| Handles are different lengths | Measured unevenly | Trim the longer handle to match |
| Ring tilts to one side | Uneven attachment | Re‑attach cords so both sides have the same number |
Design Variations
| Variation | How to Do It |
|---|---|
| Fringe bottom | Leave 10–15 cm tails, brush with a comb |
| Two‑color bag | Alternate light and dark cords |
| Beaded accents | Slide wooden beads onto cords before knotting |
| Longer bag | Increase diamond height from 20 cm to 30 cm |
| Smaller bag (purse) | Use 12 cords instead of 16 |
| Leather handles | Replace cord handles with leather straps |
Frequently Asked Questions (FAQ)
How long does it take to make this bag?
For a beginner: 4–6 hours. For someone with macramé experience: 2–3 hours.
What type of cord is best?
3mm or 4mm 100% cotton cord is ideal. It is soft, easy to knot, and holds its shape well.
Do I need a liner?
Not required. The open knot design is part of the look. However, a liner prevents small items (keys, lip balm) from falling through.
Can I wash my macramé bag?
Yes, but carefully. Hand wash in cold water with mild soap. Do not wring – press water out with a towel. Air dry flat.
My bag is curling at the edges – what went wrong?
Your tension is too tight on the outer cords. Loosen slightly, especially on the first and last knots of each row.
Finished Bag Dimensions
| Measurement | Approximate Size |
|---|---|
| Width at top | 25–30 cm (10–12 inches) |
| Height (ring to bottom) | 25–28 cm (10–11 inches) |
| Depth (front to back) | 8–10 cm (3–4 inches) |
| Handle drop | 15–20 cm (6–8 inches) |
Your bag will stretch slightly with use, especially when carrying heavier items.
Final Thoughts
Making your own macramé bag is a rewarding project. You start with a pile of cord and a wooden ring, and a few hours later, you have a beautiful, functional bag that you made with your own hands.
This pattern is perfect for:
- Beach days (sand falls right through)
- Grocery shopping (reusable and sturdy)
- Craft fairs (great seller)
- Gifts (personal and handmade)
So gather your 16 cords of 3 meters each, find your wooden ring, and start knotting. The diamond shape will emerge row by row. By the time you tie the last knot, you will have a bag that turns heads everywhere you go.
Pin This Tutorial
Save this post to your Macramé Projects or DIY Bags board. Tag a friend who loves boho style. And when you finish your bag, share a photo – we would love to see your color choices and creative touches.


")
