The Ladder Braid Bracelet— also known as the Chinese Staircase or Square Stitch — is one of the most satisfying and beginner-friendly paracord or craft lace projects you can make. It produces a flat, rectangular braid that resembles the rungs of a ladder, hence its name.
This guide breaks down every step from the original 9‑inch bracelet pattern, including a full materials list, detailed instructions, troubleshooting tips, and a bonus keychain variation. Whether you are teaching a kids’ craft class or just looking for a relaxing weekend project, you will have a finished bracelet in under 30 minutes.
What Is a Ladder Braid?
The Ladder Braid is a knotting technique using two colors of flat craft lace (also called plastic lace, gimp, or boondoggle). The finished braid has a distinct ladder‑like appearance — horizontal “rungs” created by alternating loops of each color. It is flat, flexible, and lies comfortably against the wrist.
Unlike round braids (like the classic Chinese Staircase), the Ladder Braid works up quickly and shows off both colors equally, making it perfect for two‑tone friendship bracelets, keychains, zipper pulls, and lanyards.
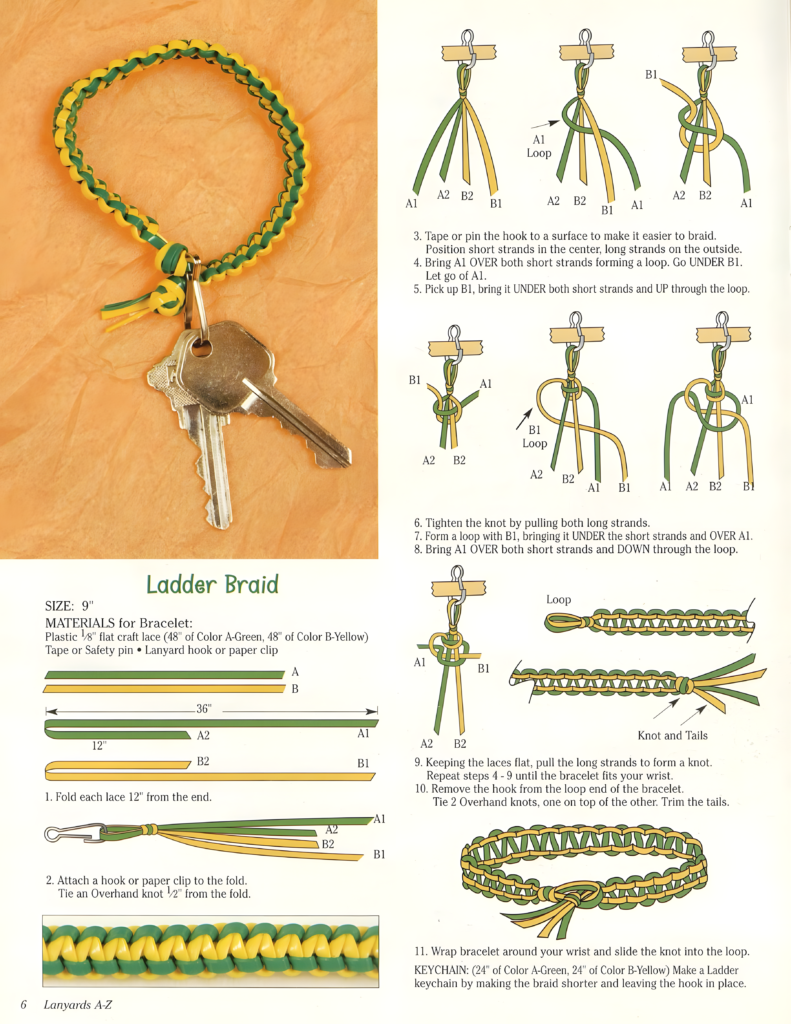
Materials List
For the Bracelet (9‑inch finished length)
| Item | Quantity | Details |
|---|---|---|
| Plastic flat craft lace | 2 strands | 1/8″ width (standard craft lace) |
| Color A (Green in example) | 48 inches | Cut from a longer skein |
| Color B (Yellow in example) | 48 inches | Cut from a longer skein |
| Tape or safety pin | 1 | To hold the starting point |
| Lanyard hook or paper clip | 1 | For the clasp / starting loop |
For the Keychain (Shorter version)
| Item | Quantity |
|---|---|
| Color A | 24 inches |
| Color B | 24 inches |
| Lanyard hook | 1 (kept in place) |
Optional Tools (Helpful but not required)
- Scissors – For trimming tails
- Lighter – To slightly melt and seal plastic lace ends (adult use only)
- Ruler or measuring tape – To measure your wrist and lace lengths
- Clipboard with a clip – Alternative to tape/safety pin for holding the work
Understanding the Diagram Labels
Before you start, it helps to understand how the original pattern labels the four working strands. After folding each 48″ strand 12″ from the end, you will have:
| Label | What it means |
|---|---|
| A1 | Color A – Short strand (the 12″ folded end) |
| A2 | Color A – Long strand (the remaining 36″) |
| B1 | Color B – Short strand (12″ folded end) |
| B2 | Color B – Long strand (36″) |
The short strands (A1, B1) become the inner “rungs” of the ladder.
The long strands (A2, B2) become the working cords that form the knots.
📌 Note: When you start, the short strands will seem too short. That is normal — they grow even shorter as you braid. The long strands are the ones you pull to tighten each knot.
Step‑by‑Step Instructions
Step 1: Fold Each Lace 12″ from the End
Take your 48″ strand of Color A (Green). Measure 12″ from one end and fold it at that point. The short side becomes A1 (12″), the long side becomes A2 (36″). Repeat with Color B (Yellow) to create B1 (short) and B2 (long).
Pro tip: Pinch the folds firmly so they do not shift.
Step 2: Attach a Hook or Paper Clip to the Fold
Place the folds of both colors together so they align. Slide a lanyard hook (or a paper clip) through all four strands at the fold point. This hook will become the clasp at the top of your bracelet.
Step 3: Tie an Overhand Knot ½” from the Fold
About half an inch (1.3 cm) below the hook, tie a simple overhand knot using all four strands together. This knot locks the hook in place and creates a small loop above it (the loop that will go over the final knot when you wear the bracelet).
Tip: Do not tie the knot too close to the hook — leave that ½” gap so the finished bracelet has room to slide over the final knot.
Step 4: Arrange the Strands Correctly
From this point on, always keep the strands flat and untwisted. The correct starting arrangement is:
- Short strands (A1, B1) in the center
- Long strands (A2, B2) on the outside
If you look at the diagram:B1 and A1 are the middle two strands.B2 and A2 are the outer left and right strands.
Step 5: The First Half‑Knot (B1 under, A1 over)
This step creates the first “rung” of the ladder.
- Take B1 (short yellow strand) and bring it under the two short center strands (A1 & B1) and over A1.
- Take A1 (short green strand) and bring it over both short center strands and down through the loop created by B1.
At this point, you should see a small loop forming around the center strands.
Step 6: Tighten by Pulling the Long Strands
Keeping all strands flat, gently pull the two long strands (A2 and B2) away from each other. Pull evenly — do not yank one side harder than the other. The knot will slide up and snug against the overhand knot from Step 3.
Important: If the knot twists or turns sideways, you have twisted a strand. Untangle and try again. The finished knot should lie flat.
Step 7: Repeat Steps 4–9 Until the Bracelet Fits
Continue making knots in exactly the same way:
- B1 goes under the center, over A1
- A1 goes over the center, down through the loop
- Pull the long strands (A2, B2) to tighten
Each knot becomes one “rung” of the ladder. The short strands (A1, B1) will get shorter and shorter — that is expected. They disappear into the center of the braid.
Measuring tip: Periodically wrap the unfinished braid around your wrist (with the hook at one end). Stop when the braided section reaches the other side of your wrist, leaving room for the final knot to fit through the starting loop.
Step 8: Finish the Bracelet
Once the braid is long enough:
- Remove the hook (or paper clip) from the starting loop. Be careful not to undo the overhand knot.
- Tie two Overhand knots — one directly on top of the other — using all four strands.
- Trim the tails to about ¼” – ½” (6–12 mm). If using plastic lace, an adult can carefully melt the ends with a lighter to prevent fraying.
Step 9: Wear Your Bracelet
Wrap the bracelet around your wrist. Slide the double overhand knot (at the end) through the starting loop (where the hook used to be). The loop stretches slightly, so do not worry if it feels snug — it will hold securely.
Keychain Variation
Want a smaller, faster project? Make a Ladder Braid keychain!
| Change | Bracelet | Keychain |
|---|---|---|
| Strand length (each) | 48 inches | 24 inches |
| Fold point | 12″ from end | 6″ from end |
| Hook | Removed at the end | Left in place as key ring |
| Braid length | Wrist circumference | ~3–4 inches |
Instructions:
- Follow the exact same knotting steps
- When finished, tie the two overhand knots right below the hook
- Trim tails
- The hook stays attached — clip your keys directly to it
A keychain takes about half the time of a bracelet and makes a great gift or bag charm.
Common Mistakes & How to Fix Them
| Mistake | What happens | Fix |
|---|---|---|
| Twisted strands | The braid spirals instead of lying flat | Untie the last knot. Lay all strands flat before pulling tight. |
| Knots are uneven | Gaps or bulges in the ladder | Pull both long strands with equal tension. Do not pull the short strands. |
| Short strands run out too soon | Cannot finish the length | You folded less than 12″. For a 9″ bracelet, 12″ short strands are the minimum. |
| Braid is too stiff | Won’t curve around the wrist | You pulled each knot too tight. Loosen slightly — the braid should flex. |
| Loop is too small | Cannot fit over the final knot | The starting overhand knot was tied too close to the hook. Leave a full ½” gap. |
Pro Tips for a Professional Finish
- Keep your work pinned – Tape the hook to a table edge or use a safety pin through the knot to secure it to your pant leg. This keeps tension even.
- Work in good light – Flat craft lace can be hard to see, especially when strands cross. Good lighting prevents mistakes.
- Pull long strands together – Use your thumb and index finger to pinch both long strands and pull simultaneously. This keeps tension perfectly balanced.
- Check your wrist size first – Wrap a string around your wrist and measure it. Add 1 inch for the knot and loop. That is your target braid length.
- Seal the ends – For plastic lace, have an adult briefly pass a lighter flame over the trimmed tails. The plastic melts into a small bead that prevents fraying. Do not overheat — it will burn.
- Experiment with colors – The Ladder Braid shows both colors equally. Try neon + black, pastel + white, or even two shades of the same color for a subtle tonal look.
Frequently Asked Questions (FAQ)
Q: Can I use paracord instead of plastic craft lace?
A: Yes, but paracord is thicker (usually 3/16″ or 4mm vs. 1/8″ plastic lace). The finished braid will be bulkier. Use a longer starting length — try 60″ each, folding 15″ from the end.
Q: Why do my short strands keep getting twisted?
A: The short strands naturally want to twist as you pull the long strands. After every 2–3 knots, stop and untwist them. Run your fingers down the short strands to straighten them.
Q: How do I make a wider ladder braid?
A: The standard Ladder Braid uses two colors (four strands total). To make it wider, you would need to learn a different braid, such as the Box Stitch or Butterfly Braid, which uses 6 or 8 strands.
Q: My bracelet curls into a tube — what went wrong?
A: You are pulling the long strands too tight and/or your short strands are twisted. Loosen your tension and make sure the short strands lie flat between knots.
Q: Can kids do this project?
A: Absolutely. The Ladder Braid is a classic camp craft. Children ages 7+ can follow these steps with a little help on the first few knots. Use tape to hold the hook to a table so they have two free hands.
Q: How long does it take to make one bracelet?
A: For an adult, 15–25 minutes. For a child, 30–45 minutes. The keychain version takes about half that time.
Final Thoughts
The Ladder Braid is a timeless, satisfying craft that delivers a beautiful result with very little waste. Once you memorize the simple 4‑step knot sequence — B1 under, A1 over, pull the longs — you can braid without even looking at the instructions.
Your action plan:
- Cut your two 48″ strands
- Fold each 12″ from the end
- Attach a hook and tie the starting knot
- Braid until the bracelet fits your wrist
- Finish with two overhand knots
- Wear it proudly or gift it to a friend
Now go make something with your own two hands — and enjoy the rhythmic, meditative process of watching the ladder grow, one rung at a time.


