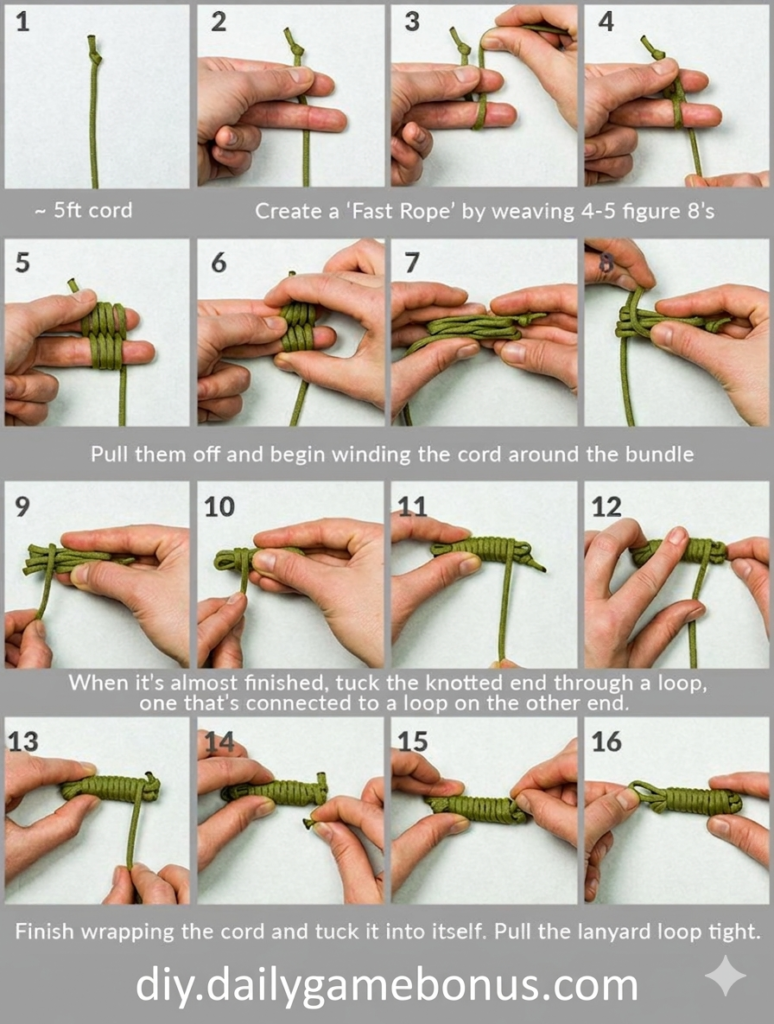
This tutorial from SGT. KNOTS shows how to create a durable, compact lanyard or keychain using a technique called the Fast Rope. It starts with a series of figure‑8 weaves, then wraps the remaining cord tightly around the bundle. The result is a strong, professional‑looking lanyard loop.
Perfect for:
- Keys
- ID badges
- Whistles
- Multi‑tools
- Paracord projects
Materials List
| Item | Quantity / Specs |
|---|---|
| Paracord or utility cord | Approximately 5 feet (1.5 meters) |
| Scissors | – |
| Lighter (for sealing ends) | Optional but recommended |
| Key ring or split ring | 1 piece (optional – to attach keys) |
Step-by-Step Instructions
Step 1 – Prepare the cord
Cut about 5 feet (1.5 meters) of cord.
If using paracord, carefully melt both ends with a lighter to prevent fraying.
Step 2 – Create the first loop
Fold the cord so you have a small loop at one end. This loop will eventually become the attachment point for your keys or hardware.
Step 3 – Begin the figure‑8 weave
Take the long end of the cord and weave it back and forth across the two parallel strands, forming the shape of a figure 8.
Each figure‑8 cross should sit snugly against the previous one.
Step 4 – Continue weaving 4–5 figure‑8’s
Weave a total of 4 to 5 figure‑8’s (as shown in the original image: “Create a ‘Fast Rope’ by weaving 4-5 figure 8’s”).
Keep tension even so the weaves stay flat and tight.
Step 5 – Check your weave
After completing the figure‑8’s, the cord should look like a short, flat, braided section with a loop at one end.
Step 6 – Pull the weaves off
Carefully slide the figure‑8 weaves together so they form a tight bundle. They will no longer look like individual figure‑8’s but rather a compact, ridged core.
Step 7 – Begin wrapping the cord around the bundle
Now take the remaining long end of the cord. Start wrapping it tightly around the bundled figure‑8 section.
Each wrap should sit directly next to the previous wrap — no gaps.
Step 8 – Continue wrapping
Keep wrapping snugly. The wraps will cover the entire bundled section and begin to form the body of the lanyard.
Step 9 – Wrap almost to the end
Continue wrapping until you have only a small amount of cord left (just enough to tuck through a loop).
Step 10 – Almost finished
At this point, the wrapped section should look neat and uniform. The working end is short.
Step 11 – Tuck the knotted end through a loop
Take the knotted end (the very tip of the cord) and pass it through a loop — specifically, one that is connected to a loop on the other end.
Original text: “When it’s almost finished, tuck the knotted end through a loop, one that’s connected to a loop on the other end.”
This step locks everything in place.
Step 12 – Finish wrapping and tuck into itself
Make the final 1–2 wraps over the tucked end, hiding it completely.
Then tuck the very tip into itself (under the last wrap).
Step 13 – Pull the lanyard loop tight
Finally, pull on the lanyard loop (the original small loop from Step 2). This tightens the entire structure, locking all wraps and tucks into place.
Done! Your Fast Rope Lanyard is Complete
You now have a sturdy, compact lanyard that can be attached to keys, a knife, a whistle, or an ID badge. The figure‑8 core makes it stronger than a simple knotted lanyard.
Pro Tips
✔ Use paracord 550 – it’s strong, comes in many colors, and melts cleanly.
✔ Keep wraps very tight – loose wraps will slip over time.
✔ Seal the final tucked end – a tiny drop of glue or a quick melt with a lighter adds security.
✔ Practice with a longer cord (6–7 feet) your first time – you can always trim excess.
✔ For a longer lanyard, simply increase the number of figure‑8’s before wrapping.
Troubleshooting
| Problem | Likely cause | Fix |
|---|---|---|
| Wraps come loose | Not tight enough | Re-do and pull each wrap firmly |
| Core feels loose | Figure‑8’s not snug | Before wrapping, squeeze the bundle tight |
| Lanyard is too short | Used less than 5ft of cord | Start with 6–7 feet next time |
| Ends fray | Not sealed | Melt with lighter (paracord only) |
Variations
- Two‑color lanyard – use a cord that changes color, or weave in a second cord
- Beaded accent – slide a large bead onto the loop before tightening
- Keychain size – use 3 feet of cord and fewer figure‑8’s
- Bracelet version – make the same knot but shorter, and add a clasp
")


