Learn how to tie a beautiful Chrysanthemum Knot (Kiku Musubi) – a traditional Japanese decorative knot used for tassels, ceremonial cords, and embroidery. Step‑by‑step guide with diagrams.
Introduction
The Chrysanthemum Knot (菊結び – Kiku Musubi) is a stunning traditional Japanese knot named after the chrysanthemum flower, which symbolizes longevity and royalty in Japanese culture. This intricate knot is most commonly seen on:
- Embroidered flags / ceremonial banners (刺繍旗 – shishū hata)
- Hand tassels (手元房 – temoto fusa)
- Traditional gift wrapping (袱紗 – fukusa)
- Kimono cords (男帯 – otoko obi)
- Martial arts rank indicators
The knot is complex, but with patience and careful attention, anyone can learn it. As the original tutorial says: “It is quite complicated, but please give it a try.”
Materials Needed
| Item | Details |
|---|---|
| Cord / silk braid | Approximately 40–60 inches (100–150 cm) – thin, flexible cord works best |
| Flat surface | A knotting board or foam pad with pins |
| T-pins (optional) | To hold loops in place while working |
| Tweezers | Helpful for tightening small sections |
| Scissors | – |
| Glue (optional) | Small amount to secure the finished knot |
Best cord types: Silk braid, satin cord, or waxed cotton. Avoid stiff or very thick cords for your first attempt.
What Is a Chrysanthemum Knot?
The Chrysanthemum Knot is a layered, flower‑shaped knot with multiple loops radiating from a tight center. When completed, it resembles the petals of a chrysanthemum flower – hence the name.
Unlike simpler decorative knots (like the four‑flower knot or the button knot), the chrysanthemum knot requires careful loop placement and sequential tightening. It is considered an advanced beginner or intermediate knot.
Understanding the Diagram References
The original Japanese tutorial references several lettered points:
- A, B, C, D, E, F – Specific cord sections or loops
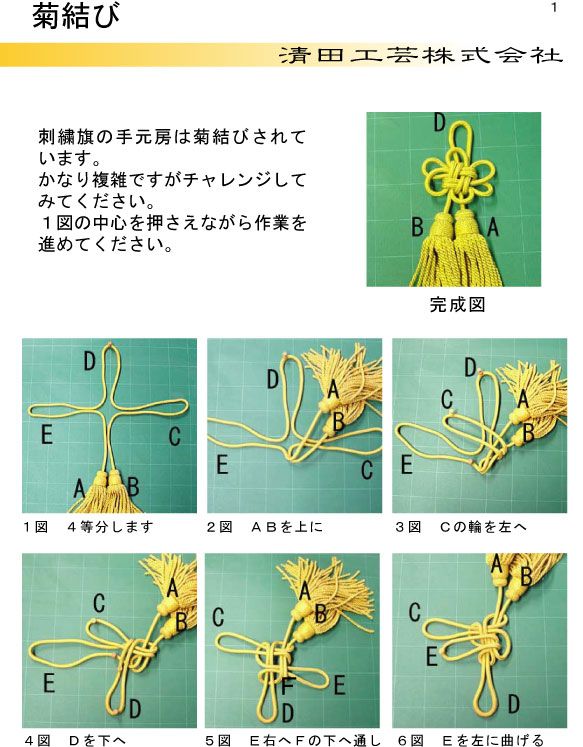
- Figure 1 – The starting diagram showing how to divide the cord into 4 equal sections
- 完成図 (Kanzenzu) – The finished knot diagram
You will work step by step, pressing down the center of the knot as you go (as noted: “Press the center of Figure 1 while working”).
Step‑by‑Step Instructions
Before You Begin
Lay your cord on a flat surface. Identify:
- The center of the cord (fold it in half to find the midpoint)
- The working ends (the two tails)
You will be creating a symmetrical knot. Work slowly – do not pull any loop fully tight until all loops are formed.
Step 1 – Divide into 4 equal sections
Take your cord and create a four‑part structure at the center. This is the foundation of the knot.
In diagram terms, you are dividing the cord into four radiating arms (like a plus sign: up, down, left, right).
Reference: “1. 図 4等分します” – Divide the diagram into 4 equal parts.
Press the center firmly with your finger or a pin. You will keep this center pressed throughout the entire process.
Reference: “1図の中心を押さえながら作業を進めてください” – Please press the center of Figure 1 while working.
Step 2 – Bring A and B upward
Identify sections A and B (likely the two left or two right sections – refer to your diagram).
Bring both A and B to the top (upward direction).
Reference: “2. 図 A Bを上に” – Diagram: Bring A and B upward.
These will become part of the upper petals.
Step 3 – Take C’s loop to the left
Find section C (probably the right or bottom loop).
Take the loop of C and move it to the left.
Reference: “3. 図 Cの輪を左へ” – Diagram: Take C’s loop to the left.
Do not pull tight yet – simply position the loop.
Step 4 – Bring D downward
Take section D and bring it downward.
Reference: “4. 図 Dを下へ” – Diagram: Bring D downward.
You now have loops in four directions: up (A+B), left (C), down (D). The remaining section (likely E/F) will be handled next.
Step 5 – Pass E to the right, under F
Take section E. Move it to the right, passing it under section F.
Reference: “5. 図 E右へFの下へ通し” – Diagram: Pass E to the right and under F.
This under‑and‑over movement creates the interlocking that gives the knot its structure.
Step 6 – Bend E to the left
Finally, take section E (which is now on the right) and bend it to the left.
Reference: “6. 図 Eを左に曲げる” – Diagram: Bend E to the left.
The loops should now be arranged in a circular, petal‑like pattern around the pressed center.
Step 7 – Tighten gradually
This is the most delicate step.
Do not pull one loop all the way tight immediately. Instead:
- Gently pull each loop a little at a time
- Work around the knot in a circle
- Keep the center pressed down
- Use tweezers to adjust small sections
The finished knot should be firm, symmetrical, and flower‑shaped.
Reference: “完成図” – Finished diagram.
Step 8 – Secure the ends
Once the knot is tight and shaped perfectly:
- Trim the excess cord tails, leaving about 1–2 inches (2–5 cm)
- Carefully melt or glue the cut ends to prevent fraying (if using synthetic cord)
- For silk cord, whip‑stitch the ends or use a small drop of clear glue
Finished Chrysanthemum Knot
When complete, your knot will have:
- A tight, round center
- Multiple radiating loops (petals) of equal size
- A flat, symmetrical shape
It is beautiful on its own or as part of a larger piece – tassels, bookmarks, keychains, or cord ends.
Pro Tips for Success
✔ Use a knotting board – A foam board with pins allows you to hold loops in place while you work.
✔ Press the center firmly – As the original tutorial emphasizes, keeping the center pressed prevents the knot from collapsing.
✔ Work with good lighting – Loop crossings are easier to see in bright light.
✔ Practice with two colors – Use a cord that changes color, or two different cords twisted together, to see which section goes where.
✔ Be patient – This knot can take 5–10 attempts before it looks right. That is normal.
✔ Photograph each step – Take pictures with your phone as you go. If you make a mistake, you can backtrack.
Troubleshooting Guide
| Problem | Likely Cause | Fix |
|---|---|---|
| Knot collapses when tightened | Center not pressed firmly | Press the center with a pin or finger while tightening |
| Loops are uneven | Pulled one loop too tight too soon | Loosen and tighten all loops gradually together |
| Cannot identify A, B, C, D, E, F | Diagram is hard to read | Draw your own diagram on paper first, labeling each section |
| Knot looks twisted | A loop went over instead of under | Undo and check every “over/under” relationship |
| Cord frays | Cut ends not sealed | Melt (synthetic) or glue (natural fiber) the ends |
Uses for the Chrysanthemum Knot
| Project | How to Use |
|---|---|
| Tassels (手元房 – temoto fusa) | Attach the knot to the top of a silk tassel |
| Embroidered flags (刺繍旗) | Tie at the corner or edge of a ceremonial banner |
| Bookmarks | Make a chrysanthemum knot at the end of a flat braid |
| Keychains | Combine the knot with a leather cord and key ring |
| Gift wrapping | Use as a decorative accent on fukusa or gift boxes |
| Kimono accessory | Attach to obijime (kimono cord) |
The Cultural Significance of the Chrysanthemum
In Japan, the chrysanthemum (kiku) is the symbol of the Imperial Family and represents:
- Longevity – The flower blooms in autumn and lives longer than most flowers
- Nobility – The Chrysanthemum Throne is the name of the Japanese monarchy
- Restoration – The flower’s ability to revive after wilting
Using the Chrysanthemum Knot on ceremonial items connects your work to centuries of Japanese tradition.
Frequently Asked Questions (FAQ)
Is the chrysanthemum knot the same as a button knot?
No. A button knot is round and compact, like a sphere. The chrysanthemum knot is flat and flower‑shaped, with radiating loops.
How long does it take to learn?
Most people need 30–60 minutes of practice to tie a presentable chrysanthemum knot. Expect 5–10 failed attempts before success.
What cord is best for beginners?
A medium‑thickness waxed cotton cord (1–2mm) is ideal. It holds its shape, does not stretch, and is easy to see.
Can I use ribbon?
Very narrow ribbon (3–4mm) can work, but wider ribbon is difficult to loop and tighten.
How do I attach the knot to a tassel?
After tightening the knot, leave the two tails long. Thread them through the top of the tassel, then tie an overhand knot or glue them inside the tassel cap.
Practice Exercises
Before making a finished piece, try these warm‑ups:
- Trace the diagram – Draw the 6 steps on paper with a pencil. Trace the cord path with your finger.
- Use a practice cord – An old shoelace or thick string (2–3mm) is easier to see and handle.
- Make mini knots – Use shorter cord (20 inches / 50cm) for faster practice sessions.
Final Thoughts
The Chrysanthemum Knot (菊結び) is one of the most beautiful traditional Japanese knots. Yes, it is complex. Yes, it takes practice. But the moment you pull that last loop and see the flower‑shaped knot form perfectly under your fingers – that feeling is worth every try.
As the artisans at Seita Kogyo Co., Ltd. (清田工芸株式会社) know, these knots have adorned ceremonial flags and fine textiles for generations. Now you can add your hands to that tradition.
Press the center. Follow the steps. Be patient. You can do this.
Pin This Tutorial
Save this post to your Japanese Crafts or Knotting Tutorials board. Tag a friend who loves traditional knots. And when you master the chrysanthemum knot, share a photo – we would love to see your beautiful work.

")