The Trilobite Braid is a unique and sought-after pattern in the world of paracord. It results in a dense, reversible, and symmetrical bracelet that has a distinctive “woven” texture. While it requires more concentration than a standard cobra knot, once you master the alternating flow, it becomes highly satisfying.
In this guide, we will break down the essential Material Science and provide a clear, Step-by-Step English Tutorial for both the setup and the final complex weave.
Part 1: The Material Science – Choosing Your Core 🧶
The Trilobite Braid requires a specific type of paracord and the correct buckle to hold its complex internal tension.
📊 Materials & Sizing Guide
You will need two lengths of 550 Paracord and one side-release buckle.
| Item | Specification | Best Use… |
| Paracord (Color A – Grey) | 10 Feet | The entire woven body of the bracelet. |
| Paracord (Color B – Grey) | 10 Feet | The second strand for the dual-core. |
| 5/8″ Plastic Buckle | Curved Contour | Provides a comfortable fit and acts as the anchor point. |
| Tools: Lighter, Scissors, Paracord Jig (Optional). |
💡 Why 550 Paracord is Essential
The Trilobite Braid is built on internal tension. 550 Paracord has an elastic core that allows the weave to tighten evenly. Using a weaker, non-cored rope will result in a messy, inconsistent pattern.
Part 2: Step-by-Step Trilobite Braid Tutorial
This tutorial follows the precise weaving sequence shown.
📝 Tutorial Text Breakdown (Matching the Image):
Part A: The Initial Anchoring Knot (The Setup)
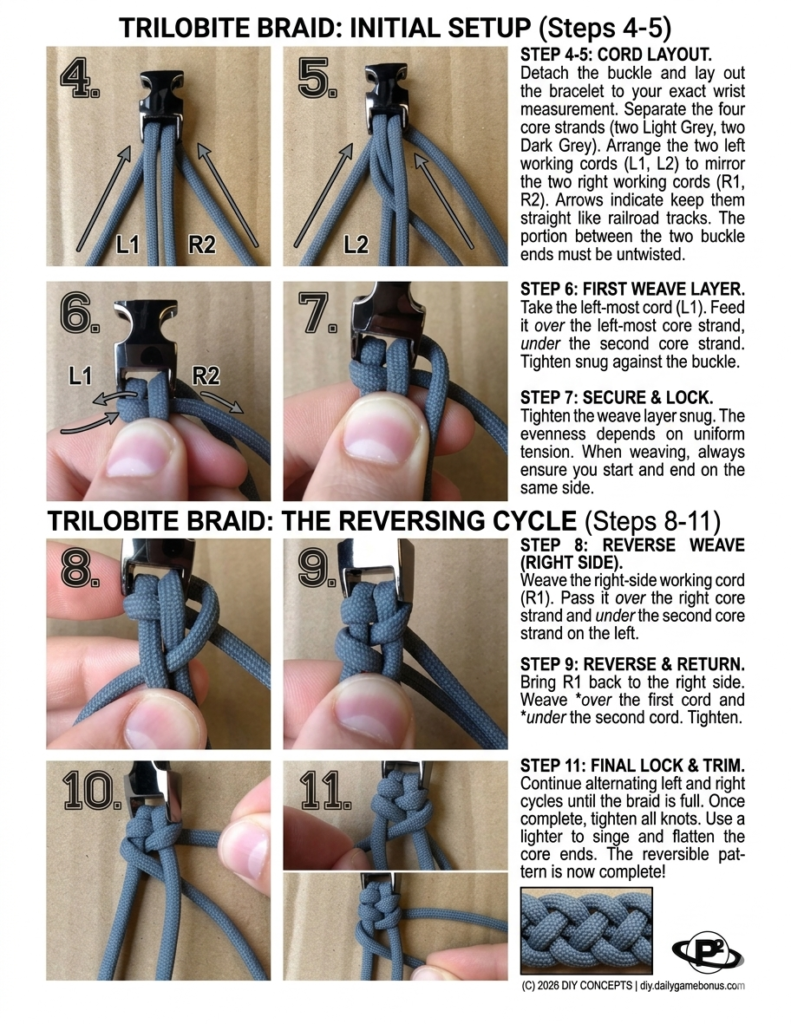
- Panel 4-5 (SETUP): This is the foundation of the Trilobite Braid. Secure your two initial 10-foot strands to the buckle and find your exact wrist measurement. Separate the four central core strands (two Light Grey, two Dark Grey). The portion of cord between the two buckle ends must be untwisted and straight.
- Panel 6 (FIRST WEAVE LAYER): The weave always starts with the left-most working cord (L1). Feed L1 over the leftmost core strand and under the second core strand. Pull it tight.
- Panel 7 (SECURE & LOCK): Cinch the first layer snug against the buckle. The final evenness depends on your uniform tension. Crucial Rule: Always start and end on the same side.
Part B: The Reversing Cycle (The Main Braid)
- Panel 8 (REVERSE WEAVE – RIGHT SIDE): The cycle now moves to the right. Take the right-side working cord (R1). Pass it over the right core strand and under the second core strand on the left.
- Panel 9 (REVERSE & RETURN): Now, reverse the movement to bring R1 back to the right side. Weave it over the first cord (A1) and under the second cord (A2). Pull snug. This completes one full cycle of the Trilobite stitch.
- Panel 10 (ALTERNATING CYCLE): Repeat Panels 8 and 9, but in reverse. Weave the left side (L1) over/under, then return. Make sure you grab the top cord each time you weave to keep the pattern stable.
- Panel 11 (FINAL LOCK & TRIM): Continue alternating left and right cycles until the braid is full. Once complete, tighten all knots. Use a lighter to singe and flatten the final core ends for a clean, permanent lock. The reversible pattern is now complete!
💡 The Ultimate DIY Concept Finishing Move:
Unlike simpler knots, the Trilobite Braid is symmetrical, meaning the pattern on the back is identical to the front. By following our new English Cheat Sheet, you can ensure your finished bracelet looks professional from every angle, making it highly valuable content for your audience.


