The Monkey’s Fist Knot is more than just a decorative knot; it is an icon of traditional seamanship and craft. While it is often used for keychains or zipper pulls today, its original purpose was a “heaving knot” for throwing lines from a ship.
This comprehensive guide transforms the classic, complex multi-step diagram into a flawless, Step-by-Step English Tutorial. We cover the crucial “Material Science” and the precise process, making it easy for beginners to master this challenging but rewarding knot.
Part 1: The Material Science – Choosing Your Core 🧵
The structure of a Monkey’s Fist knot relies on what is inside. The “core” determines the final size, weight, and definition.
📊 Materials & Sizing Guide
You will need one main rope (blue in the diagram) and one core object.
| Core Object | Size of Knot | Best Use… | Cord Type |
| Small Marble (16mm) | Small Keychain | Delicate jewelry, small zipper pulls. | 1mm Waxed Polyester or 2mm Chinese Braided Cord. |
| Large Marble (25mm) | Medium Keychain | Fob for bags, traditional lanyard. | 2mm or 3mm Braided Cord. |
| Tennis Ball | Heavy-Duty | Nautical decorations, doorstops (weights). | 6mm to 10mm Manila or Cotton Rope. |
💡 Pro-Tip for Tension
Unlike other knots, you cannot just tie it and walk away. A major factor in the final result is Consistency of Tension. As you work through the steps below, always pull the previous wrap snug before making the next move. If your wraps are loose, the knot will not hold its spherical shape once the core is removed.
Part 2: Step-by-Step Monkey’s Fist Tutorial
The key to this knot is creating a structure of three independent sets of wraps that interlock perfectly.
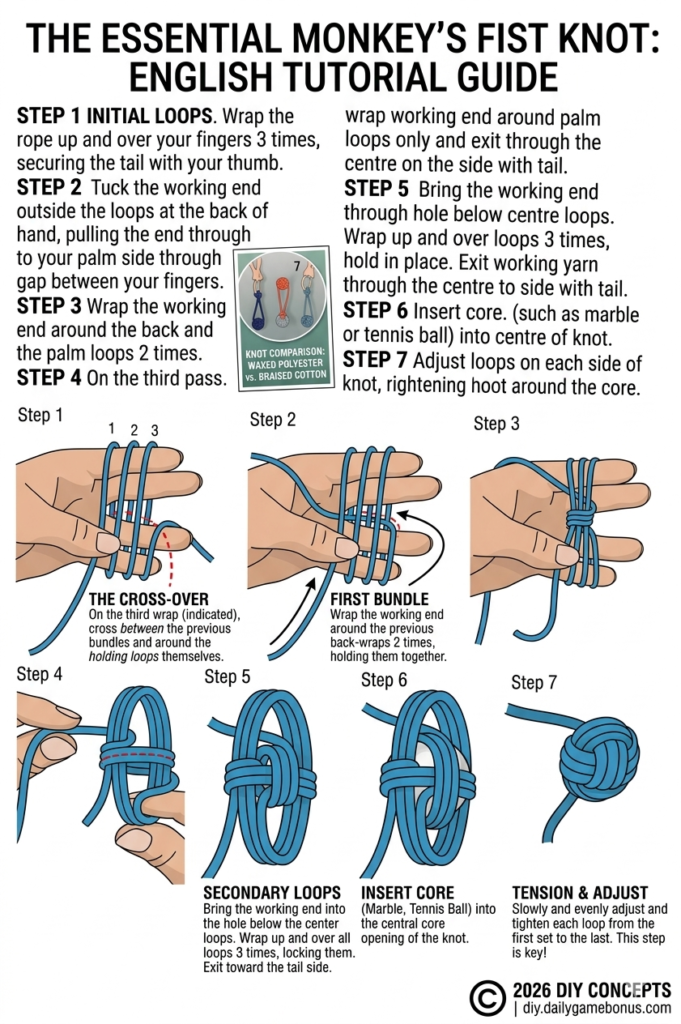
📝 Tutorial Text Breakdown (Matching the Image):
Part A: The Initial Anchoring Knot (The Palm Wraps)
- Panel 1 (STEP 1): Anchor the rope with your thumb, leaving a generous tail. Wrap the working end up and over your fingers three times. This is your initial set of loops.
- Panel 2 (STEP 2): To build the back structure, tuck the working end outside the previous loops and under the top wraps at the back of your hand. Pull snug.
- Panel 3 (STEP 3): Wrap the same working end around the initial palm loops (the front side) two full times. The first main bundle is complete.
Part B: The Locking Cross-Over
- Panel 4 (STEP 4): This is the crucial turning point. On the third pass of the second bundle, the working end must cross between the previous bundles and around the holding loops themselves.
- Panel 5 (STEP 5): Bring the working end down and through the central hole below the primary loops. Wrap up and over all previous wraps three times. This is your third set of wraps, and it locks all previous bundles.
Part C: Inserting the Core and Finalizing
- Panel 6 (STEP 6): Now that the main body is formed, but before it is completely tight, insert your chosen core (the marble, tennis ball, etc.) into the central opening.
- Panel 7 (STEP 7): This is the final and most critical step. Slowly and meticulously, starting from the very first set of wraps, adjust and tighten each loop, one after another, in order. Repeat the sequence until the knot is perfectly Spherical and solid around the core.
💡 The Ultimate DIY Concept finishing move:
Unlike other decorative knots, once you’ve completed Step 7, the Monkey’s Fist can be adapted into a professional-grade keychain, a zipper pull, or a nautical decoration. The “secret” to success is consistency, as shown in our new English Cheat Sheet.


