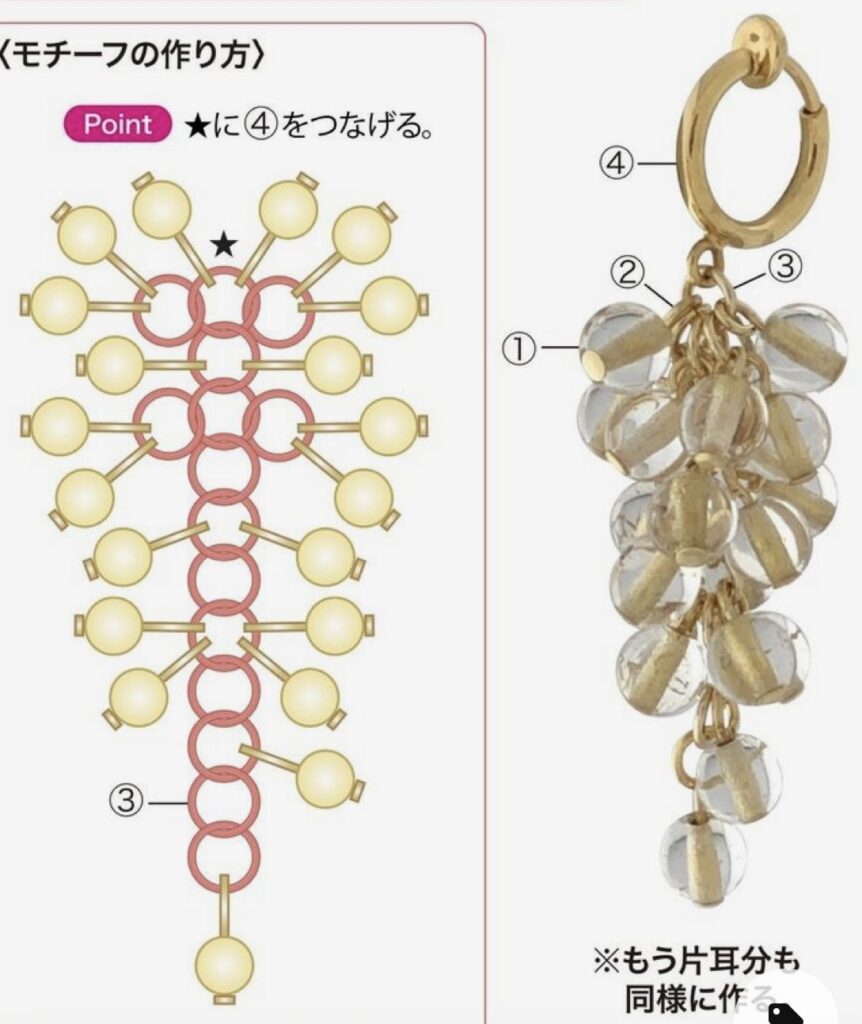
This little motif (モチーフ) is a versatile handmade component. You can turn it into earrings, a bag charm, a zipper pull, or even attach it to a bracelet. The image shows a symmetrical design — you make two identical pieces (one for each earring or each side of a project).
Materials List
| Item | Details |
|---|---|
| Beads (main color) | Small seed beads (size 11/0 or 8/0) – approx. 20–30 beads per motif |
| Accent beads (contrast) | 2–4 larger or differently colored beads per motif |
| Beading thread | Nylon beading thread or FireLine (0.2–0.25mm) |
| Beading needle | Size 10 or 12 |
| Jump rings (small) | 2 pieces (if making earrings) |
| Earring hooks (fishhook findings) | 1 pair |
| Scissors | – |
| Jewelry pliers | Round-nose or flat-nose |
For a charm or zipper pull: substitute findings accordingly.
Step-by-Step Instructions
Before You Start
- Read through all steps first.
- The symbol ★ on the diagram means: attach a finding or jump ring here (point ★).
- The notation ④ likely means: add 4 beads at a specific step (common in Japanese bead diagrams).
Step 1 – Center ring
Cut about 50cm (20 inches) of thread.
Pick up 4 beads (main color). Tie them into a tight ring by passing the needle through all 4 beads again. Pull firmly. This is the center of your motif.
Step 2 – First petal / extension
From the center ring, add beads according to your diagram.
A typical sequence might be:
- Add 3 beads → pass back through the next center bead → pull tight to form a small loop.
Repeat this around the center ring until you have 4 or 5 loops (petals).
Step 3 – Add accent beads (④ step)
Where the diagram shows ④, add 4 accent beads in one go, then pass the needle through the next bead in the previous round.
This creates a scalloped or picot edge.
Step 4 – Shape the motif
Continue adding beads in repeating sets of 3 or 4, always passing back through a bead from the previous round.
Keep tension even — not too tight, not too loose. The motif should lie flat.
Step 5 – Finish the first motif
When your motif reaches the desired size (usually 2–3cm / 1 inch across):
- Weave the thread back through 4–5 beads in different directions.
- Tie a small half‑hitch knot between beads.
- Trim the thread close to a bead.
Step 6 – Make the second motif
Repeat steps 1 through 5 exactly to create a second identical motif.
※ The image notes: 「もう片耳分も同様に作る」
→ “Make the other ear side the same way.”
Step 7 – Attach findings (Point ★)
At the ★ point on each motif:
- Open a small jump ring with pliers (twist sideways – don’t pull apart).
- Slip the jump ring through the ★ bead(s) and through the loop of an earring hook.
- Close the jump ring securely.
Repeat for the second motif.
Done! Your Finished Pair
You now have a matching pair of handmade motif earrings. They look beautiful as:
- Dangle earrings
- Shoe clips
- Gift toppers
- Phone charms (attach a lobster clasp instead of earring hooks)
Pro Tips
✔ Count carefully – Japanese motif patterns rely on exact bead counts.
✔ Use a bead mat so beads don’t roll away.
✔ Contrast works well – use a light main color + dark accent beads.
✔ For a stiffer motif, use FireLine thread. For a softer drape, use nylon.
✔ If making earrings, keep the motif lightweight – small seed beads are best.
Troubleshooting
| Problem | Likely cause | Fix |
|---|---|---|
| Motif curls up | Tension too tight | Loosen slightly |
| Gaps between petals | Tension too loose | Pull each loop tighter |
| Beads don’t line up | Wrong bead count | Undo and re‑count |
Variations
- Add a center pearl – replace the initial 4‑bead ring with 1 large pearl surrounded by 4 seed beads.
- Make a necklace pendant – create one larger motif and add a bail.
- Mix colors – use a different color for each petal.


")
