Ribbon Rei (リボンレイ) is a beautiful Japanese braiding technique that turns satin ribbon into a strong, flat, decorative cord. It’s perfect for phone straps, keychains, bag charms, or bracelet lanyards. The best part? You only need two ribbons and your hands — no loom, no beads, no glue.
Materials List
| Item | Quantity / Specs |
|---|---|
| Satin ribbon (6mm wide) | 2 pieces, each 120cm (47 inches) – two different colors |
| 8mm round jump ring | 1 piece |
| Lobster clasp or phone strap hook (Nasukan) | 1 piece |
| Crimp end cap or fold-over cord end (Kuritosh / Kōmarukan) | 1 piece |
| Hairpin or large bobby pin | 1 piece |
Optional: lighter to gently seal ribbon ends (if using polyester satin)
Step-by-Step Instructions
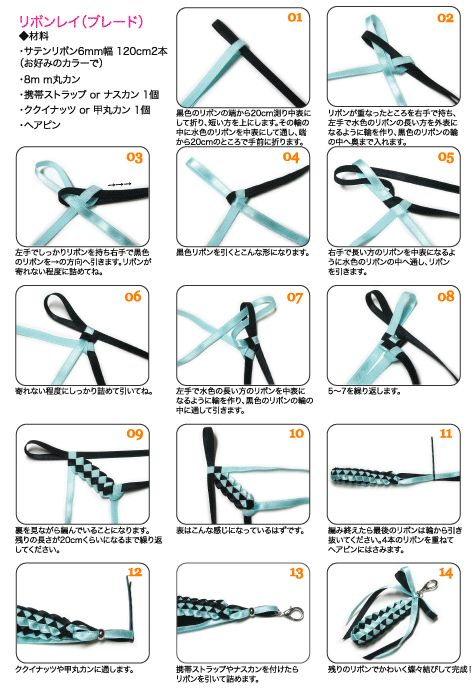
01 – Prepare the ribbons
Take the black ribbon (or your first color). Measure 20cm (8 inches) from one end. Fold it at that point with the wrong sides together (middle of ribbon facing out). The short end (20cm) should be on top.
Take the light blue ribbon (second color). Insert it through the black ribbon’s loop, also with wrong sides together. Fold it toward you at the 20cm mark.
📌 You should now have two folded ribbons interlocked, with two long tails and two short tails.
02 – First loop (light blue)
Hold the overlapping section with your right hand.
With your left hand, take the long end of the light blue ribbon and make a loop so it sits on the outside (like a “reverse” loop). Push that loop all the way through the black ribbon’s loop.
03 – Tighten the black ribbon
Hold the ribbon bundle firmly with your left hand.
With your right hand, pull the black ribbon in one direction.
Pull just enough to tighten the braid — not so hard that the ribbon wrinkles or distorts.
04 – First knot formed
After pulling the black ribbon, you’ll see the first knot shape starting to form.
05 – Switch sides (black through blue)
Now use your right hand to take the long black ribbon. Insert it into the light blue loop with wrong sides together (just like before). Pull the ribbon to tighten.
06 – Keep tension even
Pull firmly but gently. The braid should be snug, not crushed. If it twists, loosen and try again.
07 – Blue through black again
Take the long blue ribbon with your left hand. Make a loop (wrong sides together) and push it through the black ribbon’s loop. Pull to tighten.
08 – Repeat steps 5–7
Continue alternating:
- Black through blue → pull
- Blue through black → pull
Each time you pull, a new segment of the braid forms on the underside.
09 – Keep braiding until 20cm remain
You’ll be braiding while looking at the back side of the work (the underside).
Continue until the unbraided ribbon tails are about 20cm (8 inches) long.
10 – Check the front side
Flip your braid over. The front should show a neat, repeating zigzag or chevron pattern. If it looks uneven, undo a few stitches and check your tension.
11 – Finish the braid
When you’ve reached the desired length:
- Pull the last working ribbon completely out of the loop (do not add a new loop).
- You’ll now have four loose ribbon ends (two from each color).
12 – Secure the ends with a hairpin
Stack all four ribbon ends together. Slide a hairpin or bobby pin through them to keep them from unraveling while you attach the hardware.
13 – Attach the clasp (images 12–23 summary)
- Open the 8mm round jump ring using pliers (twist sideways, don’t pull apart).
- Slip the jump ring through the braided loop at the top of your ribbon braid.
- Attach the lobster clasp or phone strap hook to the jump ring.
- Close the jump ring securely.
14 – Finish the other end (hardware)
- Slide a crimp end cap (Kuritosh / Kōmarukan) over the four ribbon tails.
- Crimp firmly with pliers.
- Attach another jump ring (if needed) to connect to a phone case or bag charm.
Final Result
You now have a beautiful, handmade ribbon lanyard or phone strap. The braid is flat, flexible, and surprisingly strong — perfect for daily use.
Color Ideas
- Classic – black + white
- Pastel – pink + mint
- Bold – navy + gold
- Seasonal – burgundy + cream (autumn) / sky blue + silver (winter)
Pro Tips
✔ Use satin ribbon – it slides better than grosgrain.
✔ Polyester satin holds up longer than acetate.
✔ If your ribbon frays, quickly and carefully singe the tips with a lighter (keep fingers away!).
✔ Practice with two strongly contrasting colors first – it’s easier to see which ribbon goes where.
✔ Tension is everything: too loose = messy braid, too tight = curled edges.
Troubleshooting
| Problem | Likely cause | Fix |
|---|---|---|
| Braid twists | Ribbon orientation wrong | Undo and make sure “wrong sides together” every time |
| Gaps in braid | Not pulling tight enough | Increase tension evenly |
| Braid won’t form | Swapped colors incorrectly | Go back to step 02 and follow the loop order carefully |


 – Traditional Japanese Decorative Knot Tutorial")