DIY Tubular Bead Bracelet – A Simple & Stylish Step-by-Step Tutorial, Looking for a quick, satisfying jewelry project? This tubular bead bracelet (often called a circle stitch or tubular peyote stitch) is perfect for beginners and experienced beaders alike. It creates a flexible, rope‑like bracelet that looks great in single or multiple colors.
Materials List
- Seed beads (size 6/0 or 8/0 recommended for beginners – easier to see and handle)
- Beading thread (FireLine, WildFire, or Nymo)
- Beading needle (size 10 or 12)
- Clasp (lobster clasp, toggle clasp, or magnetic clasp)
- Jump rings (2 – to attach the clasp)
- Scissors or thread cutter
- Bead mat (optional, but helps keep beads from rolling)
Step‑by‑Step Instructions
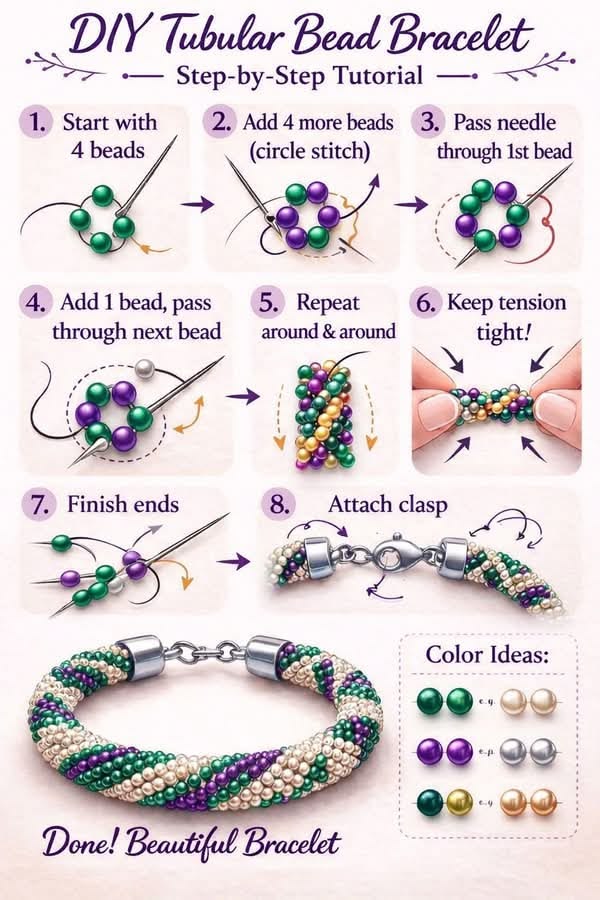
1. Start with 4 beads
Cut a comfortable length of thread (about 2 feet / 60 cm). Thread your needle and pick up 4 beads. Slide them to the middle of the thread. Tie a small overhand knot to form a ring, or pass the needle through all 4 beads again to make a tight circle.
2. Add 4 more beads (circle stitch)
Pick up 4 new beads. Pass your needle through the first bead of the original set of 4.
This creates the first “circle” – you should now have two rings of 4 beads sitting side by side.
3. Pass needle through the 1st bead, add 1 bead, pass through the next bead
Now you begin the tubular stitch:
- Add 1 bead.
- Pass the needle through the very next bead from the previous round (the one right after where your thread came out).
- Pull tight.
4. Repeat around
Keep repeating step 3: add 1 bead, then pass through the next bead from the previous round. Each new round will use 4 beads (one bead per “gap”), even though you add them one at a time.
5. Keep tension tight
As you go, gently pull the thread after each bead. Tension is the secret – tight enough to keep the tube firm, but not so tight that the bracelet curls or kinks.
6. Work around and around
Continue until the bracelet reaches your desired length (typically 6–7 inches / 15–18 cm for a wrist). The tubular structure will grow automatically.
7. Finish the ends
When you reach the right length:
- Weave the thread back through the last round of beads (no new beads added).
- Tie a few small half‑hitch knots between beads.
- Pass the needle through 3–4 more beads in different directions, then trim the thread close to a bead.
- Repeat the same finishing process on the starting end.
8. Attach the clasp
Open a jump ring with pliers (twist sideways – don’t pull apart). Slip it through the end bead(s) of the bracelet and through the clasp loop. Close the jump ring securely. Repeat on the other end with the second jump ring and the other half of the clasp.
Done! Beautiful Bracelet
Wear it alone or stack several in different colors.
Color Ideas (from your chart)
- Ombré fade – light pink → medium pink → deep rose
- Beach vibes – turquoise + sand + white
- Bold contrast – black + neon yellow or red
- Elegant neutrals – gold + cream + soft grey
- Rainbow repeat – red, orange, yellow, green, blue, purple
Pro Tips
✔ Use a stopper bead (a bead you clip or tie temporarily) to keep the first 4 beads from slipping while you start.
✔ If your tube starts to twist, you missed a bead – undo the last few stitches and check your count.
✔ For a chunkier look, use size 6/0 beads. For a dainty bracelet, try size 11/0 (requires more patience).
✔ Apply a tiny dab of jeweler’s glue on the finishing knot for extra security.
Happy beading! Let me know in the comments what color combination you try first.

")

