Master the Zipper Braid using flat craft lace. This comprehensive guide covers materials, sizing, and the “railroad track” weaving technique for a perfect finish.
The Zipper Braid: A Professional Guide to Craft Lace Weaving
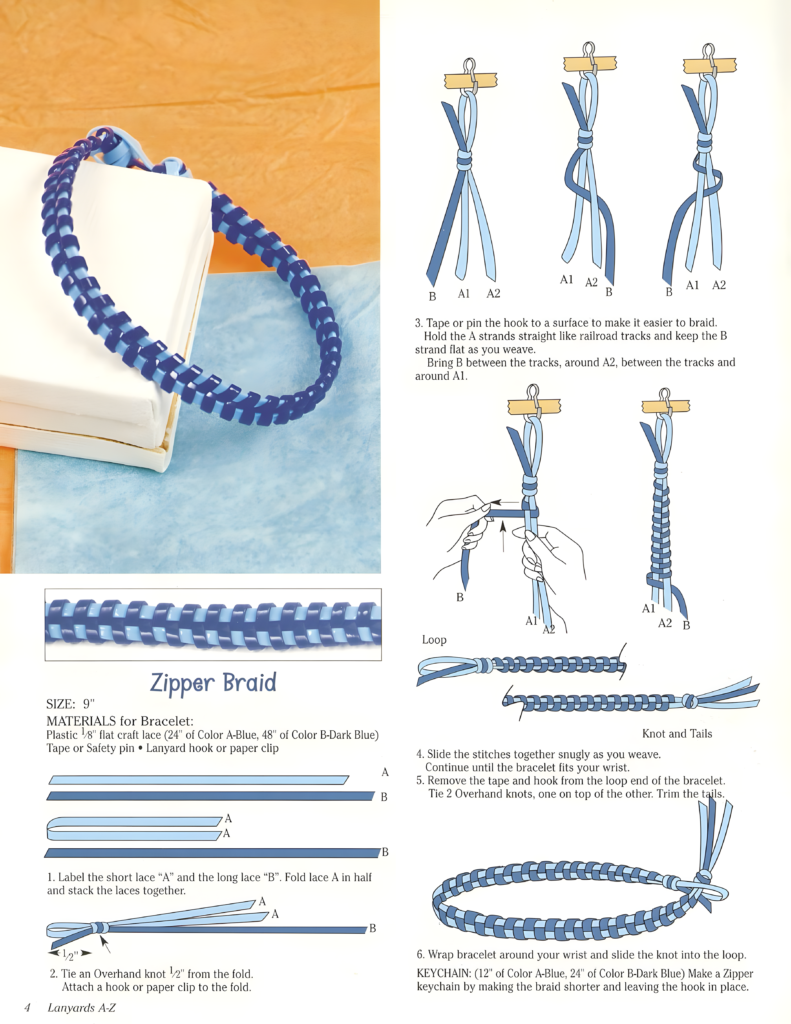
The Zipper Braid is a classic technique that creates a dense, rectangular, and highly durable bracelet. Unlike traditional round macrame, this braid uses flat $1/8″$ craft lace to create a pattern that mimics the interlocking teeth of a zipper. It is an excellent project for beginners because it only requires two colors and one repetitive movement.
Part 1: Materials & Sizing Guide 📏
To get the perfect “Zipper” look, you need to use Flat Plastic Craft Lace (often called Gimp or Boondoggle).
📊 Materials List
- Color A (Light Blue): $24″$ length (This is the “Short Lace” or the core).
- Color B (Dark Blue): $48″$ length (This is the “Long Lace” or the weaver).
- Tools: A safety pin, lanyard hook, or paper clip to hold the loop; tape to secure it to your table.
💡 Pro-Tip for diy.dailygamebonus.com
If you want to make a Keychain instead of a bracelet, use $12″$ of Color A and $24″$ of Color B. The ratio is always 1:2—the weaving cord must be twice as long as the base cord.
Part 2: Step-by-Step Tutorial – The “Railroad” Technique
This tutorial follows the “railroad track” method, which ensures your flat lace never twists, keeping the pattern clean and professional.
Step 1: The Anchor Loop
- Fold the short lace (A) in half.
- Stack the long lace (B) on top.
- Tie an Overhand knot about $1/2″$ from the fold. This creates the loop that will act as your clasp.
- Attach your hook or paper clip to the loop and tape it to your workspace.
Step 2: Setting the “Tracks”
Hold the two strands of Color A straight down. Think of these as railroad tracks. You will be weaving Color B back and forth between them.
Step 3: The Zipper Movement
- The Center Pass: Bring Color B between the two A tracks.
- The Wrap: Wrap Color B around the right-hand track (A2), then bring it back between the tracks.
- The Cross: Wrap Color B around the left-hand track (A1).
- Snug It Up: Slide the stitch upward so it sits tight against the previous one. Consistency in tension is key here!
Step 4: Finishing the Bracelet
Continue weaving until the braid fits your wrist (Standard size is about $7″ – 9″$).
- Remove the tape and hook.
- Tie two Overhand knots, one on top of the other, at the end of the braid.
- Trim the excess tails, leaving about $1/2″$ for a decorative look.
- To wear, simply slide the knotted end through the initial loop.
Part 3: Troubleshooting the Braid ⚠️
- “My braid is curving!” -> This happens if you pull Color B harder on one side than the other. Keep your tension even.
- “The lace is twisting.” -> Always keep the “shiny” side of the lace facing up. If it flips, the zipper pattern will look broken.
- “The loop is too small.” -> Always test your knot against the loop size before you finish the braid.
🎨 Concept for the “Zipper Braid Action Diagram”
This image is designed to be a streamlined, high-contrast infographic that explains the “Railroad Track” technique for creating the Zipper Braid. It transforms the multiple small drawings from image_15.png into a single, clean visual map.
- The Structure: A top-down perspective, focusing on the core concept of the “tracks.”
- The Colors: The same iconic palette from image_15.png: Light Blue (Color A – The Tracks) and Dark Blue (Color B – The Weaver).
- The Action Map:
- The Tracks (A): The two Light Blue cords are shown as vertical, perfectly straight parallel lines, labeled “THE TRACKS (Color A: Light Blue)” at the top.
- The Weaver (B): A large, bold, Dark Blue arrow shows the exact path of Color B. This arrow is labeled “THE WEAVER (Color B: Dark Blue)”.
- The Movement (Diagrammed): The arrow explicitly shows Color B moving:
- Between the two A tracks.
- Wrapping around the right track (A2).
- Returning between the tracks.
- Wrapping around the left track (A1).
- The Sequence Numbers: Numbers 1, 2, 3, 4 are placed sequentially along the Dark Blue arrow to show the exact order of the weave.
- The Vibe: Minimalist, clean graphic art (vector style). The background is a simple, blurred neutral surface, making the blue cords pop.
- Branding: A small, professional footer logo:
(C) 2026 DIY Concepts | diy.dailygamebonus.com.

📝 Your new “Zipper Braid Action Diagram” is ready!
This image is a streamlined, all-English technical diagram designed for maximum clarity on mobile screens. It simplifies the multi-step layout from image_15.png into a clear, single “Action Map.”
- Color-Coded Tracks: We use the identical Light Blue (Color A – The Tracks) and Dark Blue (Color B – The Weaver) palette to make tracing easy.
- The “Railroad Track” Technique: The diagram shows the two Light Blue (A) cords as vertical, parallel lines labeled “THE TRACKS.” The bold, single Dark Blue (B) arrow explicitly shows the entire path.
- Sequential Numbering: Numbers 1, 2, 3, 4 trace the order of the weave: between, around, between, around.
- The Inset Pattern: An enlarged animated box labeled “COMPLETE ONE FULL ZIPPER STITCH” highlights the interlocking structure, providing immediate clarity.
- Branding: A clean footer logo:
(C) 2026 DIY CONCEPTS | diy.dailygamebonus.com.
This Cheat Sheet is designed to be the most-shared image from your pillar post, as it gives beginners the “instant clarity” they need to avoid tangles and start knotting immediately.


")
