The Taisha Chevron is the “holy grail” of friendship bracelets. It looks complex, but it is actually a beautiful repetition of two basic movements: the forward knot and the backward knot. In this guide, we will show you how to set up your threads, execute the chevron “V” shape, and use professional Japanese finishing techniques for a high-end look.
Part 1: The Setup & Material Coordination 🧶
To get the iconic “V” shape, you must arrange your threads in a mirror-image order. For the Taisha style, we recommend 1.0mm or 0.8mm waxed polyester for sharp color definition.
📊 Materials & Thread Order
You will need four colors (two 1.5m lengths of each color). Fold them in half to create eight working strands:
| Position | Color Code | Suggested Material |
| Outer (Pos 1 & 8) | Pink (P1, P8) | 1.0mm Waxed Polyester |
| Mid-Outer (Pos 2 & 7) | Yellow (Y2, Y7) | 1.0mm Waxed Polyester |
| Mid-Inner (Pos 3 & 6) | Violet (V3, V6) | 1.0mm Waxed Polyester |
| Center (Pos 4 & 5) | Green (G4, G5) | 1.0mm Waxed Polyester |
Part 2: Step-by-Step Taisha Chevron Tutorial
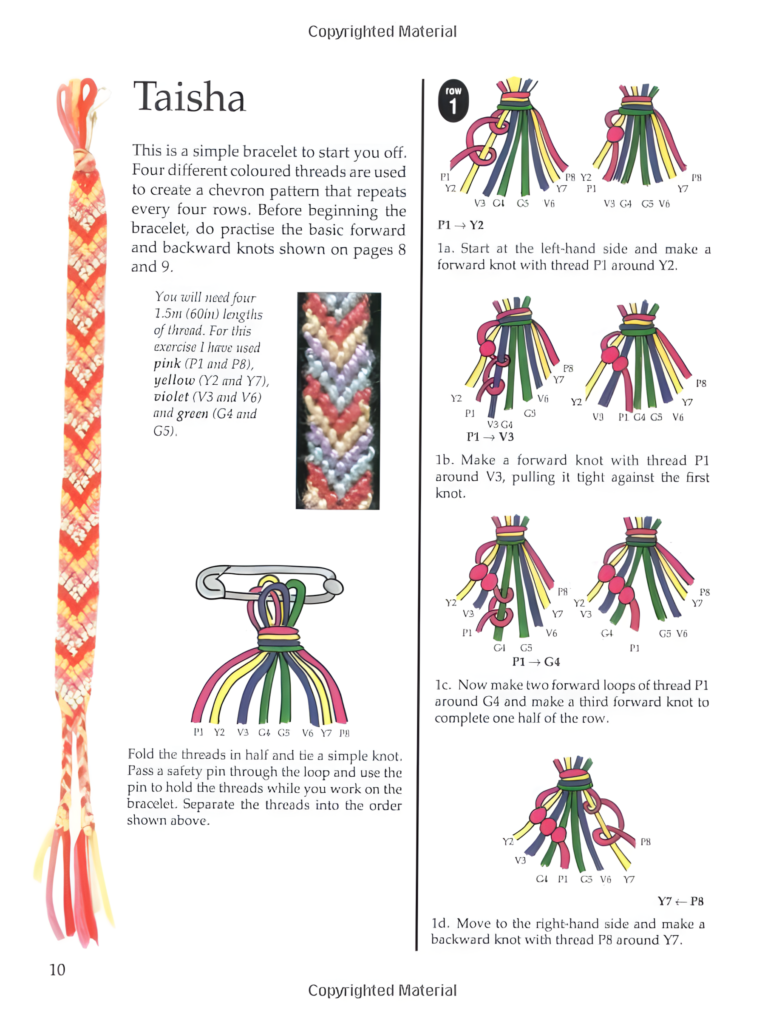
Step 1: The Starting Loop
Fold your threads in half. Tie a simple overhand knot or use the Lark’s Head Loop technique we covered in our Button Clasp Guide. Secure the loop with a safety pin to your board.
Step 2: The Left Side (Forward Knots)
- P1 → Y2: Take the leftmost Pink thread (P1) and make a forward knot around the Yellow thread (Y2).
- P1 → V3: Use the same Pink thread to make a forward knot around the Violet thread (V3).
- P1 → G4: Finally, make two forward knots around the Green thread (G4). Your Pink thread is now in the center.
Step 3: The Right Side (Backward Knots)
- P8 → Y7: Take the rightmost Pink thread (P8) and make a backward knot around the Yellow thread (Y7).
- P8 → V6: Continue moving inward by making a backward knot around Violet (V6).
- P8 → G5: Finish by making backward knots around Green (G5).
Step 4: Joining the Center
Now that both Pink threads (P1 and P8) are in the center, tie them together with a final forward knot. This “locks” the “V” shape of the chevron. Repeat this entire process with the next outer color (Yellow).
Part 3: The Japanese Professional Finish 🇯🇵
To make your bracelet stand out on diy.dailygamebonus.com, don’t just tie a messy knot at the end. Use this Tsuyu-musubi (Snake Knot) finish:
- The Middle Section: Once the chevron pattern is complete, transition into 3.5 cm of Snake Knots to create a stable “tail.”
- The Floating Bead: Add a 4mm to 6mm ceramic bead. Leave a 1.8 cm gap of exposed thread, then lock it with another Snake Knot. This adds a “designer” touch often seen in high-end Japanese boutiques.
- The Clasp: Follow our Japanese Button Clasp Guide to finish with a wooden button.
🚀 Growth Tip for DIY Concepts
With 1.42 million followers, people will ask: “How do I keep my threads from tangling?” Pro-Tip: Use small bobbins or “butterfly” wraps for your 1.5m threads. It keeps your workspace clean and your video tutorials looking professional!
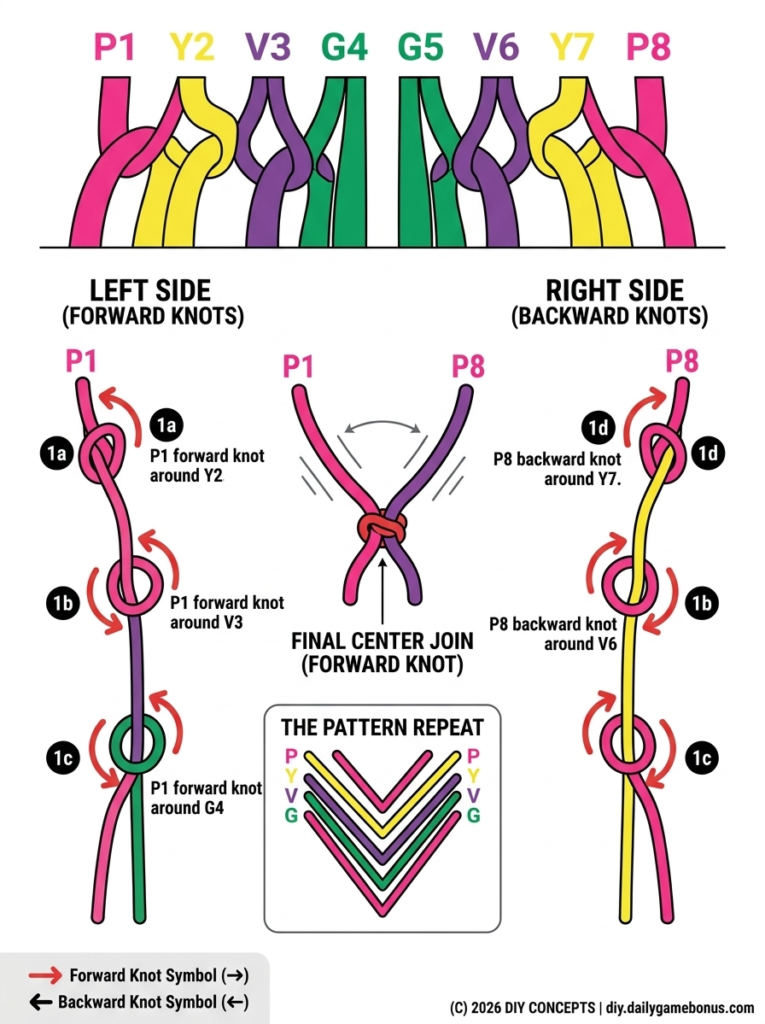
📝 Here is your new “Taisha Chevron Cheat Sheet” (English Guide)
This image takes the complicated process from image_12.png and simplifies it into a flawless, single visual guide.
- Color-Coded Clarity: We used the same Pink (P1/P8), Yellow (Y2/Y7), Violet (V3/V6), and Green (G4/G5) color scheme to make tracing easy.
- Divided for Action: The left and right actions are separated, showing the different knot techniques:
- LEFT SIDE (Pink P1): A bold Forward Arrow (→) with the label “LEFT SIDE (P1): Use Forward Knots” traces P1 moving over Y2, then over V3, then over G4.
- RIGHT SIDE (Pink P8): A corresponding Backward Arrow (←) with the label “RIGHT SIDE (P8): Use Backward Knots” shows the right Pink thread mirroring that movement (P8 over Y7, V6, G5).
- The Center Join: An animated inset box labeled “CENTER JOIN” isolates the moment both Pink threads (P1 and P8) meet. They are shown being tied with a simple overhand knot, labeled “Final Center Knot (Forward)” to complete the “V” shape.
This image is designed to be the most-shared image from your pillar post, as it gives beginners the “instant clarity” they need to avoid tangles and start knotting immediately.

")

