Learn how to create a professional macrame loop for button clasps using the Lark’s Head knot technique. Essential step-by-step guide for DIY bracelet makers.
One of the most critical parts of a handmade bracelet is the closure. If the loop is too loose, the bracelet falls off; if it’s too tight, you can’t put it on. This guide teaches you how to create a reinforced Lark’s Head Knot Loop—the gold standard for high-quality macrame jewelry that looks professional and lasts for years.
Part 1: The Material Science – Choosing Your Thread 🧵
Before you tie your first knot, you must choose the right “Engine” (the thread). For a button loop, the material must be durable, slip-resistant, and flexible.
📊 Macrame Thread Comparison Table
| Thread Type | Durability | Knot Definition | Best For… |
| Waxed Polyester (1mm) | ⭐⭐⭐⭐⭐ | Sharp & Defined | Professional, waterproof, daily-wear bracelets. |
| Chinese Braided Cord | ⭐⭐⭐⭐ | Smooth & Shiny | Colorful fashion pieces and decorative knots. |
| Organic Cotton Thread | ⭐⭐ | Soft & Matte | Natural, “Earthly” styles (low durability). |
| Linhasita (0.8mm) | ⭐⭐⭐⭐⭐ | Extremely Tight | High-end micro-macrame and intricate jewelry. |
💡 Why “Waxed” is King
For the professional loop shown in our tutorial, Waxed Polyester is the superior choice. The wax coating acts as a subtle “grip” that keeps the Lark’s Head knots from sliding or loosening. If you use non-waxed cotton, the loop may stretch over time, causing your button to eventually fall out of the clasp.
Part 2: Step-by-Step Tutorial – The Reinforced Loop
This technique uses a specialized variation of the Lark’s Head Knot to create a “ribbed” texture that is significantly stronger and more aesthetic than a plain loop of string.
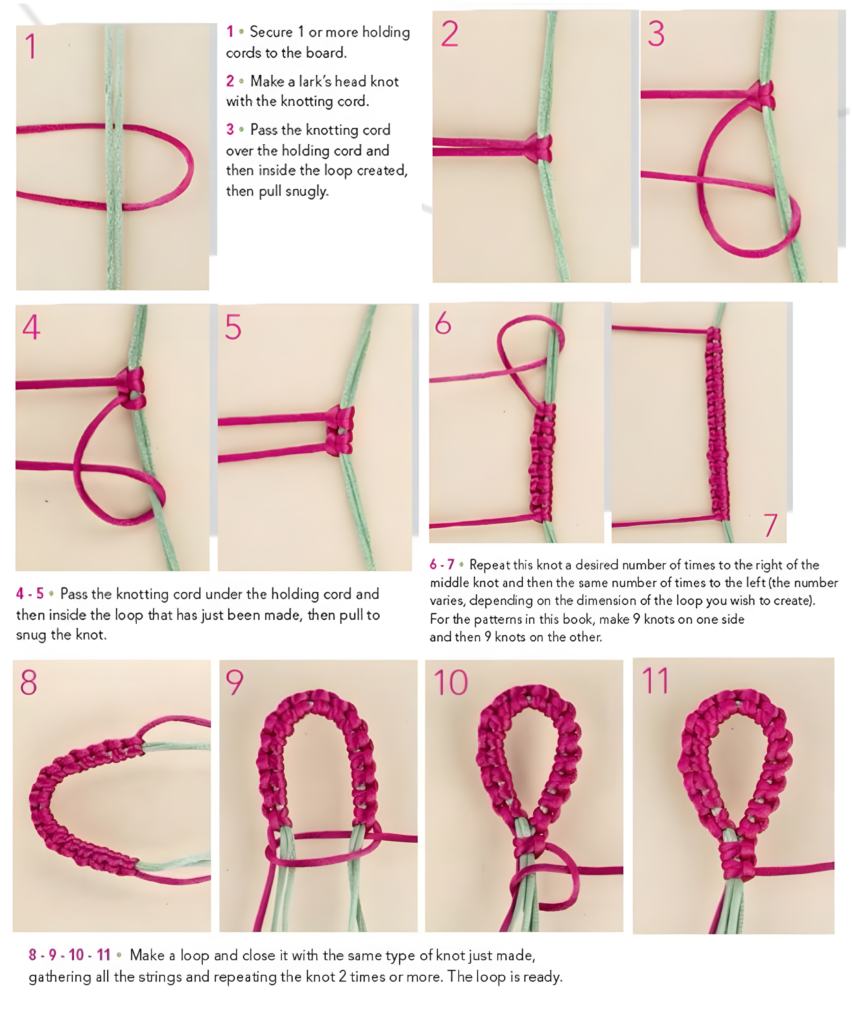
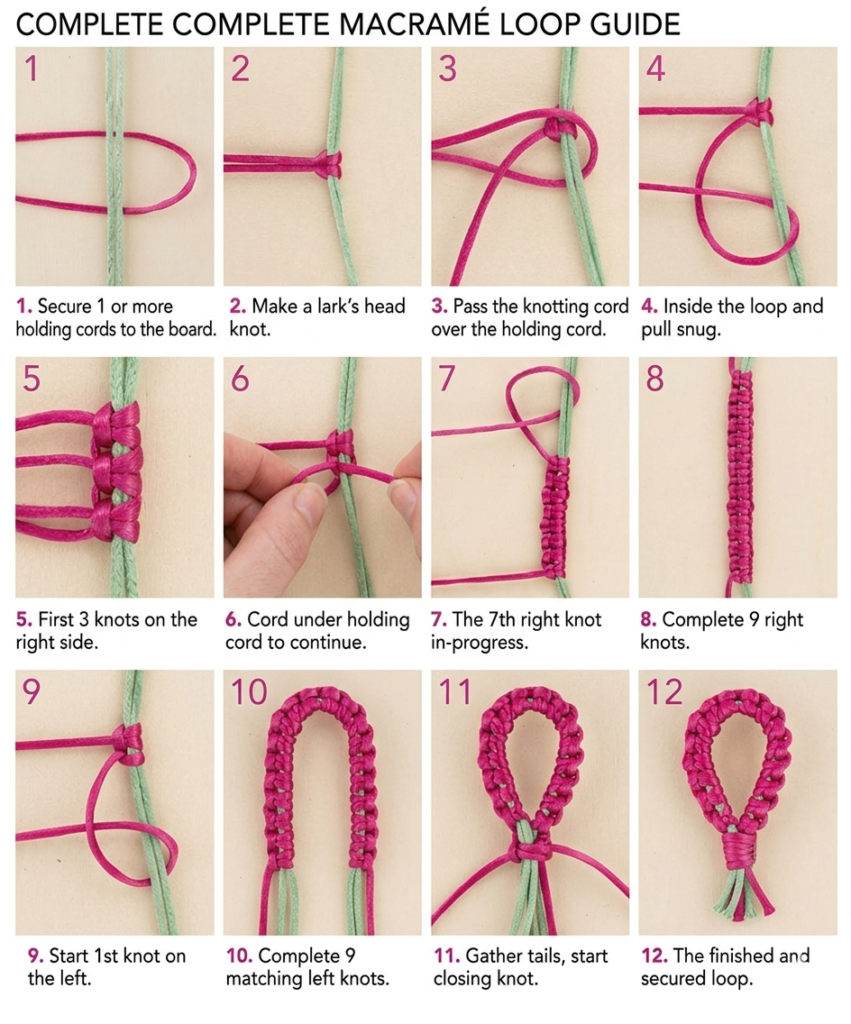
🛠️ Step 1: Preparing Your Workspace
Secure your Holding Cord (the base cord) to your macrame board or clipboard using a clip. Take your Knotting Cord (the one that will form the knots) and fold it exactly in half.
🛠️ Step 2: The Initial Anchor (Steps 1-2)
Place the fold of your knotting cord under the holding cord. Pull the two ends through the loop created by the fold. This creates your starting Lark’s Head Knot anchor.
🛠️ Step 3: The Alternating “Over-Under” Technique (Steps 3-5)
To achieve that professional, thick, ribbed texture, you must alternate the direction of your knots:
- The Over Pass: Pass the knotting cord over the holding cord, tuck it into the loop, and pull snug.
- The Under Pass: Pass the knotting cord under the holding cord, tuck it into the loop, and pull snug.
- Pro-Tip: Alternating “Over” and “Under” is the secret to a flat loop. If you only go in one direction, the cord will begin to spiral.
🛠️ Step 4: Building & Measuring (Steps 6-7)
Repeat this alternating process until you reach the desired length to fit your button.
- Standard Size: For a 10mm button, aim for 9 knots on each side of your center point (approx. 18-20 knots total).
- The Fit Test: Macrame naturally stretches about 1-2mm after wear, so make the loop slightly tight around the button at first.
🛠️ Step 5: Closing & The “Lock” (Steps 8-11)
Bend the finished knotted section into a “U” shape to form the loop.
- Gather all four cord ends together (2 holding, 2 knotting).
- Use the knotting cords to tie two to three very tight Snake Knots around the holding cords.
- This creates a sturdy “neck” that secures the loop permanently and prepares you to start the rest of your bracelet.
Part 3: Troubleshooting Common Mistakes ⚠️
To ensure your DIY project is a success, avoid these common pitfalls:
- “My loop is twisting like a DNA strand!” -> This happens when you forget to alternate the Over and Under passes. Check Step 3!
- “The knots look bumpy and uneven.” -> This is caused by inconsistent tension. Try to pull each pass with the same amount of strength.
- “The loop is too bulky for my small pearl button.” -> Switch to a 0.5mm or 0.8mm thread or reduce the total number of knots.
🚀 Final Call to Action for DIY Concepts
Now that you have mastered the professional loop, it’s time to build the rest of your masterpiece! Use this loop as the foundation for our most popular designs.
Ready for the next level? > Click here to follow our Japanese Floating Bead Bracelet Guide – it uses this exact loop as its starting point!

")

")