Learn how to make a magic ring (magic circle) for crochet with this easy step‑by‑step tutorial. Perfect for amigurumi, hats, granny squares, and any project worked in the round.
Introduction
If you have ever tried to crochet in the round, you have probably encountered the magic ring (also called the magic circle or adjustable ring). It is a technique that allows you to start a round project with a tight, closed center – no gaps or holes.
Unlike the traditional method of chaining 4 and slip stitching to form a ring, the magic ring lets you pull the center completely closed. This is essential for:
- Amigurumi (stuffed toys)
- Hats (top-down)
- Granny squares
- Coasters
- Mandalas
- Any project where you do not want a visible hole in the middle
In this tutorial, I will walk you through 15 simple steps to create a perfect magic ring. Let us grab our yarn and hook.
Materials Needed
| Item | Details |
|---|---|
| Yarn | Any weight – worsted weight (size 4) is best for beginners |
| Crochet hook | Size appropriate for your yarn (e.g., 5.0mm for worsted weight) |
| Scissors | – |
| Stitch marker (optional) | To mark the start of each round |
| Tapestry needle | For weaving in ends |
What Is a Magic Ring?
A magic ring is an adjustable loop that you create with yarn before working your first round of stitches. Once you complete your stitches, you pull the free end to tighten the loop, closing the center completely.
Advantages of the magic ring:
- No visible hole in the center of your work
- Adjustable – you can make it as tight or loose as needed
- Professional, clean finish
Disadvantages (for beginners):
- Can feel awkward at first
- Requires practice to master
Do not worry – after 2–3 tries, it will become second nature.
Step‑by‑Step Instructions
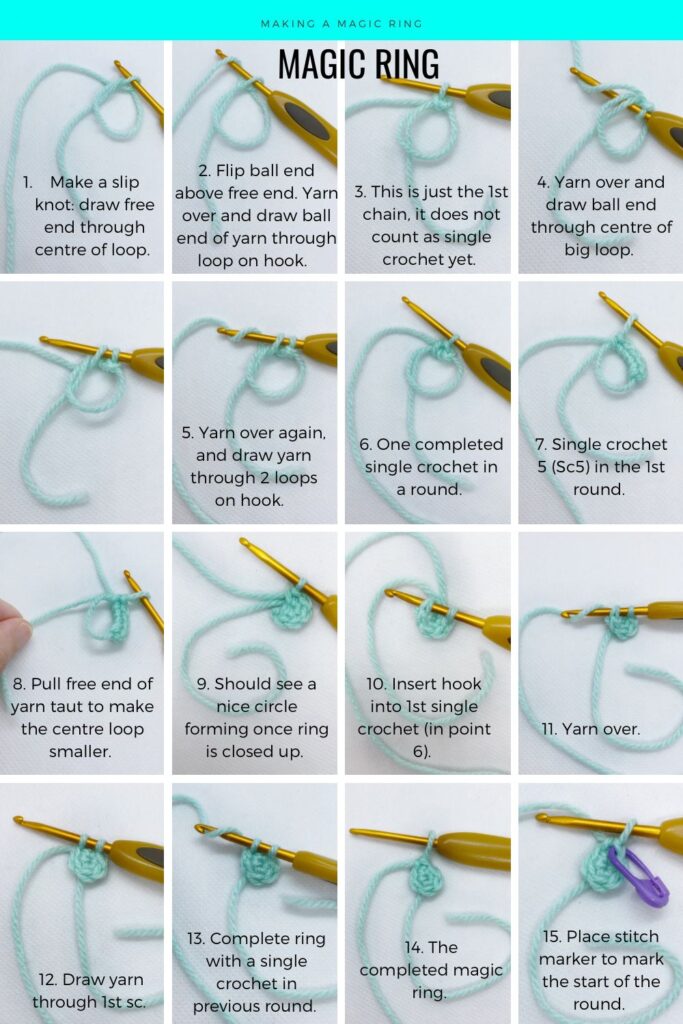
Step 1 – Make a slip knot (but not really)
Hold the yarn tail (free end) in your left hand. Create a loop by crossing the free end over the ball end (the yarn attached to your skein).
Draw the free end through the center of the loop. This creates a loose, adjustable loop on your fingers.
Image reference: “1. Make a slip knot: draw free end through centre of loop.”
Step 2 – Flip and yarn over
Flip the ball end (the yarn going to your skein) above the free end.
Yarn over (wrap the yarn over your hook) and draw the ball end of yarn through the loop on your hook.
Image reference: “2. Flip ball end above free end. Yarn over and draw ball end of yarn through loop on hook.”
Step 3 – First chain (does not count)
You have just made your first chain. This chain does not count as a single crochet stitch yet. It simply secures the ring.
Image reference: “3. This is just the 1st chain, it does not count as single crochet yet.”
Step 4 – Yarn over through the center
Now insert your hook into the center of the big loop (not into a stitch – into the empty space).
Yarn over and draw the ball end of yarn through the center of the big loop.
You should now have 2 loops on your hook.
Image reference: “4. Yarn over and draw ball end through centre of big loop.”
Step 5 – Complete the first single crochet
Yarn over again.
Draw the yarn through both loops on your hook.
Image reference: “5. Yarn over again, and draw yarn through 2 loops on hook.”
Step 6 – One single crochet completed
You have just made one single crochet stitch inside the magic ring.
Image reference: “6. One completed single crochet in a round.”
Step 7 – Single crochet 5 more times
Continue making single crochet stitches inside the same center loop.
For this tutorial, you will make a total of 6 single crochets (Sc 6) in the first round. Your image shows Sc5 (5 single crochets), but you can adjust the number based on your pattern.
Insert hook into the center loop → yarn over → pull through → yarn over → pull through 2 loops. Repeat.
Image reference: “7. Single crochet 5 (Sc5) in the 1st round.”
Step 8 – Pull the free end to close
Now for the magic part!
Hold the stitches you just made with your fingers. Gently pull the free end (the yarn tail).
You will see the center loop begin to tighten and close.
Image reference: “8. Pull free end of yarn taut to make the centre loop smaller.”
Step 9 – A nice circle forms
Continue pulling until the center is completely closed. There should be no gap or hole.
You should now see a neat, tight circle of stitches.
Image reference: “9. Should see a nice circle forming once ring is closed up.”
Step 10 – Insert hook into the first single crochet
To complete the round, you need to join the last stitch to the first stitch.
Insert your hook into the first single crochet you made (the one from Step 6).
Image reference: “10. Insert hook into 1st single crochet (in point 6).”
Step 11 – Yarn over
Wrap the yarn over your hook as usual.
Image reference: “11. Yarn over.”
Step 12 – Draw through the first stitch
Pull the yarn through the first single crochet stitch.
You should now have 2 loops on your hook.
Image reference: “12. Draw yarn through 1st sc.”
Step 13 – Complete the ring
Yarn over and draw through both loops on your hook. This creates a slip stitch or a single crochet join, depending on your pattern.
The ring is now closed and secure.
Image reference: “13. Complete ring with a single crochet in previous round.”
Step 14 – The completed magic ring
Congratulations! You have made a perfect magic ring. The center is tight, the stitches are even, and you are ready to continue crocheting in rounds.
Image reference: “14. The completed magic ring.”
Step 15 – Place a stitch marker
To keep track of where each round begins, place a stitch marker into the first stitch of the round.
If you do not have a stitch marker, use a small piece of contrasting yarn or a safety pin.
Image reference: “15. Place stitch marker to mark the start of the round.”
Now What? Continue Crocheting in the Round
Once your magic ring is complete, you can continue adding rounds:
Round 2: Increase in each stitch (2 single crochets in each stitch) → 12 stitches
Round 3: Increase every other stitch → 18 stitches
Round 4: Increase every third stitch → 24 stitches
And so on. This is how amigurumi balls, hats, and circles are made.
Common Magic Ring Patterns (Stitch Counts)
| Pattern Type | Round 1 Stitches | How Many to Chain? |
|---|---|---|
| Amigurumi (small) | 6 sc | No chain – start directly |
| Amigurumi (large) | 8 sc | No chain |
| Hat (top-down) | 10–12 dc | Chain 2 (counts as first dc) |
| Granny square | 12 dc | Chain 3 (counts as first dc) |
| Coaster | 8–10 hdc | Chain 1 (may count) |
Always check your specific pattern for the exact number.
Pro Tips for a Perfect Magic Ring
✔ Use a larger hook for the first round – One size larger than your pattern calls for makes it easier to insert the hook into the tight ring.
✔ Do not pull too tight too early – Leave the ring slightly loose until you finish your first round of stitches. Then pull tight.
✔ Leave a long tail (4–6 inches) – You will need it to weave in later. A short tail can pull out.
✔ Practice with smooth, light‑colored yarn – Dark or fuzzy yarn makes it hard to see your stitches.
✔ Hold the ring with your fingers – Keep gentle pressure on the stitches while you work so they do not twist.
Troubleshooting Guide
| Problem | Likely Cause | Fix |
|---|---|---|
| Center will not close | You worked stitches over both the loop AND the tail | Undo and restart – make sure you only work into the loop |
| Ring comes undone | Did not weave in the tail properly | Weave the tail through 5–6 stitches in different directions |
| Hole in the center | Did not pull tight enough | Pull the tail firmly – it should close completely |
| Stitches are twisted | Hook inserted into the wrong part of the stitch | Make sure you go under both loops of each stitch |
| Cannot find the first stitch | No stitch marker used | Always mark the first stitch of each round |
Magic Ring vs. Chain‑4 Method
| Feature | Magic Ring | Chain 4 + Slip Stitch |
|---|---|---|
| Center hole | None – completely closed | Small hole remains |
| Adjustability | Yes – pull to tighten | No – fixed size |
| Difficulty | Moderate (needs practice) | Easy |
| Best for | Amigurumi, hats, closed centers | Granny squares, lace, open centers |
For amigurumi and stuffed toys, the magic ring is far superior. For granny squares or decorative motifs, either method works.
Frequently Asked Questions (FAQ)
Why is my magic ring not closing?
You probably worked your stitches over both the loop and the tail. The hook should go into the center hole, not around the tail. Undo and try again.
Can I use a magic ring for double crochet?
Yes! The same steps apply. Instead of single crochet, work double crochet stitches into the center loop. You may need to chain 2 or 3 first (this counts as your first double crochet).
How do I weave in the magic ring tail?
Thread the tail onto a tapestry needle. Pass it through 5–6 stitches on the wrong side of your work, change direction, and go through 5–6 more stitches. Trim close to the yarn.
Can I undo a magic ring?
Yes. If you have not woven in the tail yet, simply pull the tail to open the ring and remove your hook.
My magic ring keeps twisting – what am I doing wrong?
Your first stitch may be twisted. Make sure you insert the hook into the center loop from the correct direction (usually from front to back). Using a stitch marker helps.
Projects That Use the Magic Ring
Here are some beginner‑friendly projects that start with a magic ring:
- Amigurumi animals – bears, bunnies, cats, dogs
- Crochet balls – juggling balls, stress balls, pet toys
- Hats (beanie style) – start at the top and work down
- Coasters – flat circles in any color
- Christmas ornaments – small, flat circles decorated with embroidery
- Flower centers – the middle of a crochet flower
- Mandalas – intricate circular patterns
Final Thoughts
The magic ring is one of those crochet techniques that feels impossible until it suddenly clicks. Do not give up after one or two tries. Every crocheter struggles with it at first.
Once you master it, you will never go back to the chain‑4 method for amigurumi or hats. The clean, closed center is worth the practice.
So grab your yarn and hook. Follow the 15 steps. Make a few magic rings in a row. By the fifth one, you will be teaching your friends how to do it.
Pin This Tutorial
Save this post to your Crochet for Beginners or Amigurumi Tips board. Tag a friend who is learning to crochet. And when you master the magic ring, share a photo – we would love to celebrate with you.


