Learn how to make a stunning emerald green and gold beaded bracelet. This beginner‑friendly tutorial includes a full materials list, weaving instructions, and tips for a professional finish.
Keywords: emerald green bead bracelet, gold bead bracelet, DIY beaded bracelet, how to weave beads, seed bead bracelet tutorial, jewelry making for beginners
Introduction
There is something undeniably elegant about the combination of emerald green and gold. It is rich, regal, and surprisingly easy to work with. Whether you are making a bracelet for yourself, a gift for a friend, or a piece to sell at a craft fair, this design is a perfect choice.
In this tutorial, you will learn how to create a woven beaded bracelet using emerald green beads as the foundation and gold beads as elegant accents. The technique is a simple weave that repeats every fourth bead. By the end, you will have a professional‑looking bracelet that fits comfortably on any wrist.
Let us gather our materials and begin.
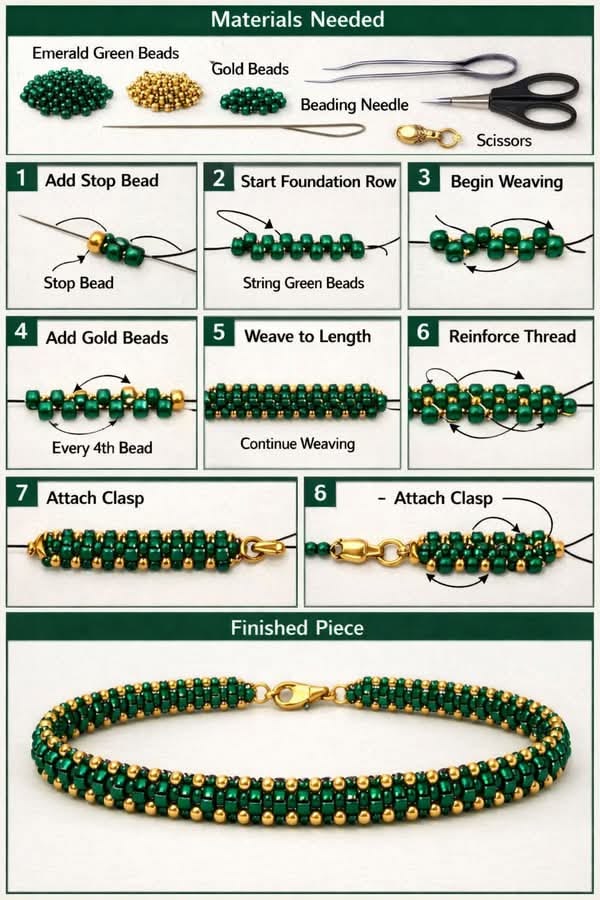
Materials Needed
Before you start, make sure you have the following items on hand:
| Material | Purpose |
|---|---|
| Emerald green beads (size 8/0 or 11/0) | Main color – foundation of the bracelet |
| Gold beads (same size) | Accent color – adds sparkle and contrast |
| Beading needle (size 10 or 12) | For threading through small bead holes |
| Beading thread (FireLine, WildFire, or Nylon) | Strong thread that will not break easily |
| Stop bead | Holds beads in place while you start |
| Clasp (lobster, toggle, or magnetic) | To open and close the bracelet |
| Jump rings (2 pieces) | To attach the clasp |
| Scissors | For cutting thread |
| Bead mat (optional) | Prevents beads from rolling away |
Pro tip: Size 8/0 beads are larger and easier for beginners. Size 11/0 beads create a finer, more delicate bracelet but require more patience.
Step‑by‑Step Instructions
Step 1 – Prepare Your Thread and Add a Stop Bead
Cut approximately 2 feet (60 cm) of beading thread. This is enough for a standard 6–7 inch bracelet with some extra for weaving and finishing.
Thread your needle. Then add a stop bead about 4 inches (10 cm) from the end of the thread. A stop bead is simply a bead that you temporarily add to prevent other beads from sliding off. You can use any spare bead for this.
Image reference: “Add Stop Bead”
Step 2 – Start the Foundation Row
The foundation row is the base of your bracelet. It determines the width and starting length.
Pick up a sequence of beads following this pattern:
- 4 emerald green beads
- 1 gold bead
- 4 emerald green beads
- 1 gold bead
Continue this pattern until you have a strip long enough to wrap around your wrist minus the clasp. For a 6.5‑inch wrist, aim for approximately 6 inches of beads.
Image reference: “Start Foundation Row”
Step 3 – Begin Weaving (Row 2)
Now you will start the actual weaving process. This is where the bracelet gains its structure.
3.1 Pass your needle back through the second‑to‑last bead of your foundation row.
3.2 Add 1 gold bead onto your needle.
3.3 Skip the next bead in the foundation row, then pass your needle through the following bead.
3.4 Pull tight. You will see the gold bead sit slightly above the foundation row.
Image reference: “Begin Weaving” and “Add Gold Beads”
Step 4 – Repeat the Weave Every 4th Bead
The pattern is simple and repetitive:
- Add 1 gold bead
- Pass through the 4th bead of the previous row
- Pull snug
Continue this all the way across the foundation row. Each gold bead will align with the gold beads from the foundation row, creating a vertical stripe of sparkle.
Image reference: “Every 4th Bead” and “Continue Weaving”
Step 5 – Weave to Desired Length
Once you complete the second row, you simply repeat the same process again and again:
- Row 3: add emerald green beads in the gaps, or continue with gold accents depending on your design
- Row 4, 5, 6, etc.: keep the rhythm of add one bead → pass through the 4th bead of the previous row
For a classic emerald + gold bracelet, alternate:
- Row with gold accents (add gold beads)
- Row with all emerald (add only emerald beads)
This creates a subtle checkerboard or striped effect.
Continue until the woven section measures 6 to 7 inches (depending on your wrist size).
Image reference: “Weave to Length”
Step 6 – Reinforce the Thread
Beaded bracelets experience daily wear and friction. To make yours last for years, you should reinforce the thread at several points.
After every 1–2 inches of weaving, pass your needle back through the previous 5–6 beads in the opposite direction. This doubles the thread through those beads and adds tremendous strength.
Image reference: “Reinforce Thread”
Step 7 – Finish the End of the Bracelet
When your bracelet has reached the correct length:
7.1 Weave the thread back through the last 4–5 beads of the final row.
7.2 Tie two or three half‑hitch knots between two beads (not on top of a bead).
7.3 Pass the needle through 3–4 more beads in different directions.
7.4 Trim the thread as close to a bead as possible.
7.5 Remove the stop bead from the starting end. Thread that loose tail onto your needle, then repeat the same finishing process (weave back, knot, trim).
Image reference: “Reinforce Thread” (also applies to finishing)
Step 8 – Attach the Clasp
You will need two jump rings and your chosen clasp.
8.1 Open one jump ring using pliers (twist sideways – do not pull apart).
8.2 Slip the jump ring through the end loop of your bracelet (the gap between the last two rows of beads).
8.3 Attach the clasp to the same jump ring.
8.4 Close the jump ring securely.
8.5 Repeat the same process on the other end of the bracelet with the second jump ring and the other half of the clasp.
Image reference: “Attach Clasp” (two images – “Attach Clasp” and “6 Attach Clasp”)
Step 9 – Finished Piece
Congratulations! Your emerald green and gold beaded bracelet is complete.
Image reference: “Finished Piece”
Hold it up to the light. The emerald beads will catch the green tones, while the gold beads will sparkle warmly. This bracelet looks stunning on its own or stacked with other beaded designs.
Tips for a Professional Finish
| Tip | Why It Helps |
|---|---|
| Use waxed thread | Reduces tangling and helps knots stay tight |
| Pull each stitch snug | Prevents gaps between beads |
| Weave back through beads every inch | Doubles thread strength – prevents breakage |
| Melt nylon thread ends (carefully!) | Creates a tiny “blob” that cannot slip back through beads |
| Test fit before finishing | Easier to add or remove beads before tying final knots |
Design Variations
Once you master the basic weave, try these variations:
- Reverse colors – gold foundation + emerald accents
- Add a third color – white or crystal beads between each emerald
- Thicker bracelet – use size 6/0 beads
- Dainty bracelet – use size 11/0 beads and thinner thread
- Charm accent – add a small gold charm to the clasp
Troubleshooting Common Problems
| Problem | Likely Cause | Solution |
|---|---|---|
| Beads are loose / gappy | Not pulling thread tight enough | Pull each stitch firmly after passing through a bead |
| Bracelet twists | Uneven tension on left vs. right side | Check that you are pulling straight, not at an angle |
| Thread breaks | Old or low‑quality thread | Use FireLine or WildFire – much stronger than standard nylon |
| Clasp feels loose | Jump ring not fully closed | Use pliers to squeeze jump ring closed – no visible gap |
Frequently Asked Questions (FAQ)
How long does this bracelet take to make?
For a beginner: about 1–2 hours. Once you learn the rhythm, you can finish one in 30–45 minutes.
What size beads are best for beginners?
Size 8/0 – they are large enough to see clearly and easy to handle.
Can I use elastic thread instead?
Elastic is not recommended for woven bracelets. The weave needs a non‑stretch thread to keep its structure. Use elastic only for simple stringing (no weaving).
How do I clean my beaded bracelet?
Gently wipe with a soft, dry cloth. Avoid water, perfumes, and lotions – they can damage the thread over time.
Why Emerald Green and Gold?
Emerald green symbolizes renewal, growth, and elegance. Gold represents success, warmth, and luxury. Together, they create a color combination that works for:
- Holiday gifts (Christmas colors with a luxurious twist)
- Birthday presents (emerald is May’s birthstone)
- Evening wear (adds sophistication to any outfit)
- Everyday luxury (pairs beautifully with jeans and a white shirt)
Final Thoughts
Making your own jewelry is deeply satisfying. This emerald green and gold beaded bracelet is more than an accessory – it is a skill‑builder. You learn tension control, pattern repetition, and proper finishing techniques. Once you finish one bracelet, you will be ready to experiment with new colors, patterns, and widths.
So thread your needle, pour yourself a cup of tea, and enjoy the rhythm of weaving. Your wrist – or the wrist of someone you love – will thank you.
Pin This for Later
Save this tutorial to your DIY Jewelry or Beading Projects board. Tag a friend who loves handmade accessories. And when you finish your bracelet, share a photo – we would love to see your color combinations.
")

")
