Master the 4-Strand Turk’s Head Terminal Knot, The Turk’s Head is a classic of decorative marlinspike seamanship, often used as a sliding toggle or a permanent collar. The Terminal Knot variation is unique because it is designed to securely end a braid, creating a symmetrical, basket-weave button finish.
This tutorial takes you through the multi-step process for the 4-strand version, complete with an English “Action Map” to ensure your success. While complex, this knot provides a professional, “boutique-quality” finish that can’t be replicated with simple overhand knots.
Part 1: Material Science & Prep 🧵
To successfully execute this knot, you need strands that are flexible but firm. Traditional 550 Paracord is an excellent starting choice.
📊 Materials List
The Strand: Use one main rope (blue in the action diagram) unraveled into four individual working strands. Each strand should be approx. 6″ long.
Anchor: A rubber band or constriction knot to hold the unraveled base in place.
Finishing Tools: Needle-nose pliers and a lighter (for synthetic rope) or water (for leather/rawhide).
💡 The Key to Success: Loose Wraps
When tying the initial stages (Steps A-C), the biggest mistake beginners make is pulling the loops too tight. The diagram (Panel A) shows that the loops must be “Loosely Folded”. If your loops are tight, you will not have space to weave the subsequent strands through. The final result relies on creating a “loose basket” that is only compressed in the very last stage.
Part 2: Step-by-Step Turk’s Head Terminal Knot
This tutorial follows the exact weaving sequence shown
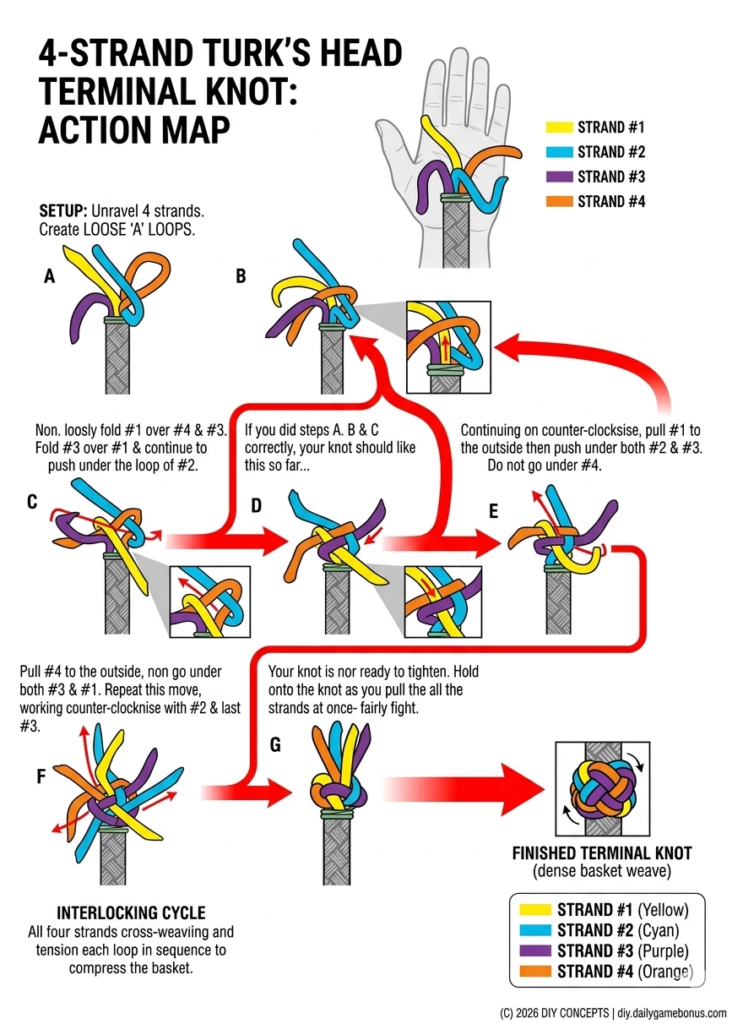
🛠️ The New English “Action Map”:
📝 Tutorial Text Breakdown (Matching the Image):
This complex knot relies on precise over/under movements. We have detailed the entire structure with a simplified English visual guide, ensuring your 1.42 million followers can succeed on diy.dailygamebonus.com.
Part A: Establishing the Basket (Steps A-C)
- Panel A: Loosely fold the Orange cord (#4) down toward the unraveled base. Cross the Yellow cord (#1) over it.
- Panel B: Take the Purple cord (#3) and bring it up over both Yellow (#1) and Orange (#4), and over itself, creating a series of three loose loops.
- Panel C: To interlock the structure, cross the Yellow cord (#1) over Orange (#4) and the central Purple (#3) loop. Tuck the yellow cord down and through the Purple (#3) loop to lock the first basket weave. Panel D shows a perfect intermediate check.
Part B: Weaving the “Terminal Finish” (Steps E-G)
- Panel E: Continuing on the same counter-clockwise path, take the Purple cord (#3) to the outside, then push under both Yellow (#1) and the unraveled Orange (#4).
- Panel F: Secure the finish by pulling Orange (#4) to the outside, then weaving under both Yellow (#1) and the central unraveled Purple (#3). All three primary strands (#4, #1, #3) are now interlocked. The final structure is complete!
- Panel G: This is the critical compression. Follow the previous over/under path in reverse, pulling each loop individually with needle-nose pliers. Pull the loose, interwoven basket down until it compresses into a dense, spherical button knot, as shown in the animated inset.


")