The secret to a “boutique-quality” bracelet starts with your thread. For these specific patterns, 1.0mm waxed cotton or nylon cord is highly recommended because the wax provides the “grip” needed to keep complex knots from slipping.
The Essentials Checklist:
- Holding Cords: 2 strands of 80cm each (or 160cm folded).
- Decorative Elements: 4 stone or ceramic beads and one flat wooden or plastic button for the clasp.
- Essential Tools: A macrame board or clipboard to maintain consistent tension.
Part 1: The Professional Start – The Reinforced Loop
A standard loop can stretch and fail over time. This reinforced technique creates a sturdy “eyelet” that looks as good as it functions.
- Anchoring: Secure your holding cords to your board.
- The Lark’s Head Foundation: Create an initial Lark’s Head knot with your knotting cord.
- Building the Ribbed Texture: * Pass the knotting cord over the holding cord, through the loop, and pull snug.
- Pass the knotting cord under the holding cord, through the loop, and pull snug.
- Sizing: Repeat this alternating sequence 9 times on each side of the center.
- Closing the Eyelet: Bend the section into a “U” shape and secure it by tying the knot 2 or more times around all gathered strings to lock the loop.
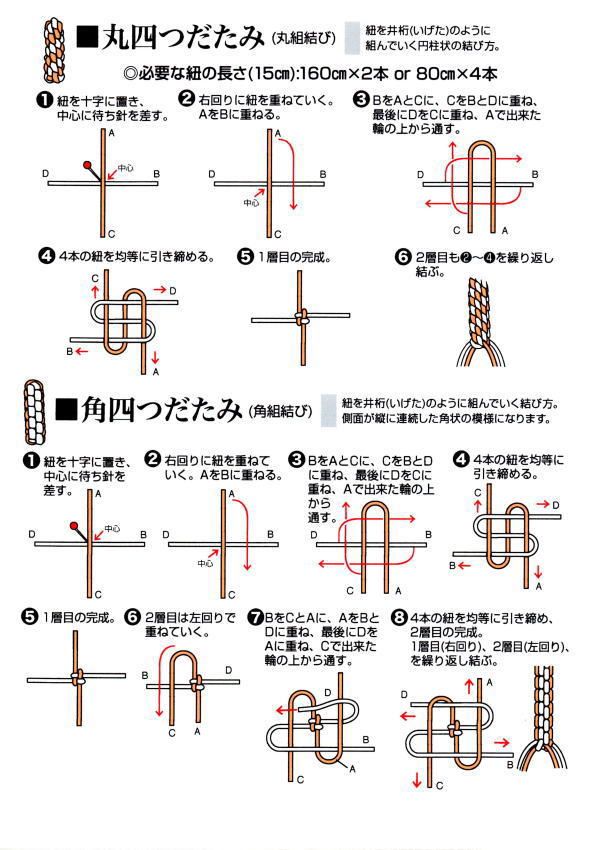
Part 2: Advanced Body Patterns (Tatami Knots)
Choose your desired texture for the main body of the bracelet. Both patterns require precise cord placement in a cross $(+)$ shape to start.
Option A: The Round Four-Way Knot (Maru-yotsu)
This creates a cylindrical, spiral-like cord.
- Layer the cords in a consistent clockwise direction: Cord A over B, B over C, C over D, and D through the loop created by A.
- Pull all four ends evenly to create the first layer.
- Repeat the clockwise sequence for the entire length.
Option B: The Square Four-Way Knot (Kaku-yotsu)
This results in a square-profile cord with distinct vertical lines.
- Follow the clockwise steps above for the first layer.
- The Pro Switch: For the second layer, reverse the direction and layer the cords counter-clockwise.
- Alternating directions between layers is what creates the geometric square shape.
Part 3: The “Floating Bead” Design & Professional Finish
The “Floating Style” is a hallmark of Japanese macrame, using negative space to highlight decorative beads.
- Solid Transition: Tie Snake Knots (Tsuyu-musubi) for 3.5cm directly below your loop.
- The Floating Effect: * Thread one bead onto a single cord.
- Leave a gap of approximately 1.8cm.
- Lock the bead in place with a single Snake Knot.
- Repeat this 3 times, alternating sides to create a zigzag effect.
- Symmetry: Complete the design with another 3.5cm of solid Snake Knots.
- The Button Clasp:
- Thread two cords through the button holes.
- Tie a final Snake Knot behind the button to prevent sliding.
- Add decorative beads to the remaining tails, tie an overhand knot, and trim the excess.
 – Traditional Japanese Decorative Knot Tutorial")
")