Are you looking for a unique, artisanal piece to add to your collection? This Japanese-inspired macrame bracelet uses the elegant Tsuyu-musubi (Snake Knot) technique to create a “floating bead” effect that looks professional but is surprisingly simple to master.
Whether you are a beginner or an experienced crafter, this guide provides the exact measurements and knotting steps to ensure a perfect fit every time.
🧶 Materials Needed:
- Cord: 1.0mm Waxed Cotton or Nylon Cord (approximately 2 meters).
- Beads: 4–6mm Colorful Stone or Ceramic Beads (labeled a, b, c, d in the diagram).
- Button: 1 Flat wooden or plastic button for the clasp.
- Tools: Scissors, Measuring Tape, and a Macrame Board (or clipboard).
🛠️ Step-by-Step Instructions:
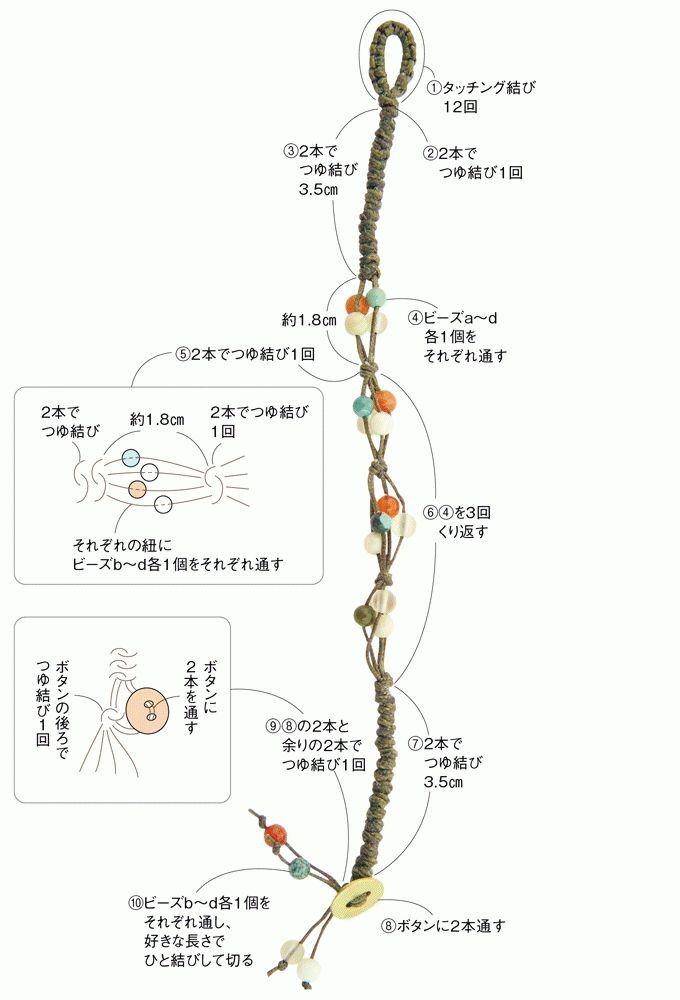
Step 1: The Loop (Touching-musubi)
Start by creating the top loop. This will be the “eye” for your button clasp.
- Perform 12 Lark’s Head knots (Touching-musubi) to create a sturdy circle.
Step 2: The First Snake Knot
- Bring the two cords together and perform 1 Snake Knot (Tsuyu-musubi) to secure the loop.
Step 3: The First Solid Section
- Continue tying Snake Knots for $3.5$ cm. This creates the first “stiff” section of the bracelet.
Step 4: Adding the Beads (The Floating Style)
- Thread one bead (Bead A) onto one of the cords.
- Leave a gap of approximately $1.8$ cm.
- Perform 1 Snake Knot to lock the bead in place.
- Repeat this 3 times as shown in the diagram, alternating beads or placing them on different cords to create the “floating” effect.
Step 5: The Middle Section
- Perform another $3.5$ cm of solid Snake Knots. This mirrors the top section for symmetry.
Step 6: The Button Clasp (The Finish)
- Step 8 in Diagram: Thread both cords through the holes of your button.
- Step 9 in Diagram: Tie a final Snake Knot behind the button to keep it from sliding.
- Step 10 in Diagram: Add a few decorative beads to the “tails” of the cord, tie a simple overhand knot, and trim the excess.